- View products

Windows OS (2nd Gen)
NearHub Board Max

Windows OS
NearHub Board S Pro

For Huddle Rooms
NearHub Board S55

For Medium Rooms
NearHub Board S65

For Large Rooms
NearHub Board S75

For Broad Rooms
NearHub Board S86

Smart Digital Photo Frame with Air Quality Monitor
NearHub Frames 10

USB Drawing Tablet
NearHub MagicPad ST1160

Real-time Online Whiteboard
NearHub Canvas

Digital Signage and Batch Management
NearRooms
- View products

True 4K 360° All-in-1 Camera for Hybrid Meetings
Nearity 360 Alien

True 4K 120° All-in-1 Camera for Team Collaboration
Nearity 120 Max

Professional Audio&Pioneering Daisy-Chain
Nearity A20S

4K UHD 120° Webcam for Hybrid Meeting
Nearity V30S

360° All-in-one Camera for Pro Group Chat
Nearity 360 Basic

All-in-one Camera for Group Meeting
Nearity C45

Powerful PTZ Camera with 10x Hybrid Zoom
Nearity V410

Firmware Updater and Device Controller
NearSync
- View products
- Meeting Room
- Meeting Scenario
- Whiteboard


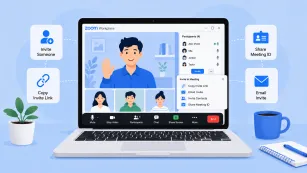
Joining a virtual meeting as “John’s iPad” or “User123” is a common but easily avoidable mistake. Having the correct display name ensures clarity and professionalism, whether you are entering a casual catch-up or a high-stakes presentation.
If you are wondering how to change name on zoom, you are in the right place. This beginner’s guide covers the differences between temporary and permanent name changes, offering step-by-step instructions for desktop, web, and mobile apps.
Key Takeaways
- Temporary vs. Permanent: Temporary changes only last for the current meeting session, while permanent updates change your default identity across the entire Zoom ecosystem.
- Live Meeting Edits: You can quickly change your name during a call via the Participants panel by clicking More and selecting Rename.
- Account-Level Updates: Permanent name changes are best done through the Zoom Web Portal profile settings, which sync across all logged-in devices.
- Troubleshooting Roadblocks: If you can't change your name, it is likely due to the host disabling the feature, corporate IT restrictions, or being stuck in the virtual Waiting Room.
Quick Answer: How to Change Your Name on Zoom
If you need to change your name immediately, follow these fast methods:
- During a Meeting (Temporary): Click the Participants icon on the toolbar -> Click More next to your name -> Select Rename.
- Before a Meeting (Permanent): Log in to the Zoom Web Portal -> Go to Profile -> Click Edit next to your name -> Update your Display Name and click Save.
Understanding Your Zoom Identity: Temporary vs. Permanent Changes
Before diving into the steps, it is essential to understand that there are two primary ways to manage your identity on the platform. The method you choose depends entirely on your immediate needs.
Temporary Name Changes (Session-Only) A temporary change occurs while you are actively participating in a video call. This adjustment only lasts for the duration of that specific session. Once the host ends the call, your profile will revert to its original default settings. This method is ideal if you need to quickly add your pronouns, include your company name for an inter-organizational webinar, or fix a typo on the fly.
Permanent Name Changes (Profile Update) A permanent change involves accessing your core account settings. When you update your profile, the new data becomes your default identity across the entire Zoom software ecosystem. This means every time you join a future room, your preferred label will automatically appear. This is the best approach if you want to establish a consistent, professional brand identity.
Now that we have established the difference, let’s explore exactly how to change your name on zoom using both methods.
How to Change Display Name on Zoom Permanently
If you want your correct name to appear automatically every time you click a meeting link, you need to adjust your account profile. Here is how to do it across different devices.
Method 1: Using the Zoom Web Portal (Browser)
The most reliable way to make permanent adjustments to your account is through the Zoom web portal. This method works perfectly regardless of whether you are using a Windows PC, a Mac, or a Chromebook.
- Sign In: Open your preferred web browser and navigate to
zoom.us/profile. Log in using your email and password, or your single sign-on (SSO) credentials. - Access Your Profile: Once logged in, look at the left-hand navigation sidebar and click on Profile.
- Edit Your Details: You will see your current name at the top of the page. Click the Edit button located directly to the right of it.
- Update the Fields: You will see text boxes for "First Name," "Last Name," and "Display Name." Your Display Name is what other participants will actually see on their screens. Enter your desired professional name here.
- Save Changes: Scroll down to the bottom of the section and click Save. Your new identity is now synced across your account.

Method 2: Using the Zoom Desktop Client (Windows & Mac)
If you rely heavily on the desktop software for your daily workflow, you can initiate the profile update directly from the application dashboard.
- Open the App: Launch the Zoom desktop application and ensure you are logged in.
- Open Settings: Click on your profile picture or avatar in the top-right corner of the window.
- Navigate to Profile: From the dropdown menu, click on My Profile.
- Redirect to Web: The application will automatically open a new tab in your default web browser, directing you to your profile page.
- Make the Change: Just like the browser method, click Edit next to your name, type in your new Display Name, and click Save.

Method 3: Using the Zoom Mobile App (iOS & Android)
For professionals managing communications on the go, updating your settings via the mobile application is incredibly straightforward.
- Launch the App: Open the Zoom app on your smartphone or tablet.
- Access Settings: Tap the More icon (three horizontal dots) in the bottom-right corner of your screen, or tap your profile picture at the top of the screen depending on your exact app version.
- Open Your Profile: Tap on your current name or email address at the very top of the menu to open your profile settings.
- Edit Display Name: Tap on the Display Name tab.
- Enter New Details: Type your preferred name into the text fields provided.
- Save: Tap Save or Done in the upper right corner to lock in the changes.
How to Change Name on Zoom Meeting (Temporary Change)
Sometimes, you may forget to update your profile beforehand, prompting the question: how to change my name on zoom while the call is already happening? Fortunately, the software allows you to re-identify yourself in real time without leaving the room.
On the Desktop Client
- Open Participants Panel: Wiggle your mouse to bring up the bottom control toolbar. Click on the Participants icon.
- Locate Your Name: A side panel will open on the right side of your screen showing everyone in the call. Find your name at the very top of this list.
- Select Rename: Hover your mouse cursor over your name. Click the More button (or the three dots icon), and select Rename from the dropdown menu.
- Confirm the Change: A small pop-up window will appear. Type your desired name into the text box and click Change or OK. Your video feed label will update instantly for everyone in the room.

On the Mobile App
- Tap the Screen: If the meeting controls are hidden, tap your screen once to reveal the bottom toolbar.
- Open Participants: Tap the Participants icon.
- Find Your Profile: Locate your name in the participant list and tap on it.
- Rename Yourself: A menu will pop up. Select Rename, type in your new preferred name, and tap Done to finalize the adjustment.
Troubleshooting: Why Can’t I Change My Name?
Occasionally, you might follow the steps above but find that the system restricts your actions. Here are the most common roadblocks and how to solve them.
- The Host Disabled the Renaming Feature If you are wondering why the "Rename" button is completely missing during a live session, the meeting host has likely disabled the "Allow participants to rename themselves" security setting. This is common in large webinars or educational environments to prevent disruptive behavior. To fix this, you must send a private chat message to the host and politely ask them to rename you from their end.
- Your IT Administrator Locked Your Profile If you are using a corporate or university-issued enterprise account, you might log into the web portal only to find the "Edit" button next to your display name grayed out or entirely absent. This means your organization’s IT administrator has locked profile edits at the account level. You will need to contact your IT helpdesk directly to request a formal update to your internal directory.
- You Are Stuck in the Waiting Room Zoom does not permit users to alter their display labels while sitting in a virtual Waiting Room. If you realize your label is incorrect before the host admits you, your only option is to leave the meeting entirely, update your display name in your core app settings, and rejoin using the same link.
Final Thoughts
Navigating the nuances of video conferencing software does not have to be frustrating. Knowing how to change display name on zoom is a fundamental skill that empowers you to present yourself accurately and professionally in any digital environment.
Whether you are permanently updating your corporate identity through the web portal or making a quick adjustment during a live collaboration session, it only takes a few clicks to ensure your colleagues, clients, and peers know exactly who they are speaking with. Keep these simple steps in mind, and you will be fully prepared for your next virtual meeting.
FAQs
To get the host's attention without interrupting, click the Reactions button on the bottom toolbar and then click Raise Hand. A small hand icon will appear in your video frame and next to your name in the participant list. To lower it, click the same button and select Lower Hand.
- Can I hide my name entirely on Zoom?
No, Zoom requires a display name for all participants to maintain meeting security and accountability. However, you can change it to a generic label or your initials if you prefer more privacy.
First, install the "Zoom for Outlook" add-in from the Microsoft AppSource. Once installed, open your Outlook calendar and create a new event. Click the Add a Zoom Meeting button (usually in the top ribbon). This will automatically generate a Zoom link and dial-in details within the body of your calendar invite.
- Desktop: Install the "Zoom for Google Workspace" add-on from the Google Workspace Marketplace. When creating a calendar event, click Add video conferencing and select Zoom Meeting.
- Mobile: Ensure the Google Calendar app and Zoom app are installed. If you have the Workspace add-on enabled on desktop, the option to add Zoom will appear in the "Add video conferencing" dropdown when creating an event on mobile.
- How can I improve Zoom meetings for a group in one room?
To improve group Zoom meetings, make sure everyone can be clearly seen and heard. A laptop camera usually cannot cover the whole room, especially in roundtable discussions.
For full-room meetings, the Nearity 360 Alien is a good option. It provides a 360° panoramic view, AI video modes, and built-in microphones, helping remote participants see the whole room and follow the conversation more naturally.

- Do I need an external camera for Zoom meetings?
For one-on-one Zoom calls, a laptop camera is usually enough. But for small or medium meeting rooms, an external camera can provide better video coverage and a more professional meeting experience.
The Nearity 120 Max is suitable for small to medium rooms, with 4K video, a 120° wide-angle view, AI auto-framing, built-in microphones, and speaker audio.