- View products

Windows OS (2nd Gen)
NearHub Board Max

Windows OS
NearHub Board S Pro

For Huddle Rooms
NearHub Board S55

For Medium Rooms
NearHub Board S65

For Large Rooms
NearHub Board S75

For Broad Rooms
NearHub Board S86

Smart Digital Photo Frame with Air Quality Monitor
NearHub Frames 10

USB Drawing Tablet
NearHub MagicPad ST1160

Real-time Online Whiteboard
NearHub Canvas

Digital Signage and Batch Management
NearRooms
- View products

True 4K 360° All-in-1 Camera for Hybrid Meetings
Nearity 360 Alien

True 4K 120° All-in-1 Camera for Team Collaboration
Nearity 120 Max

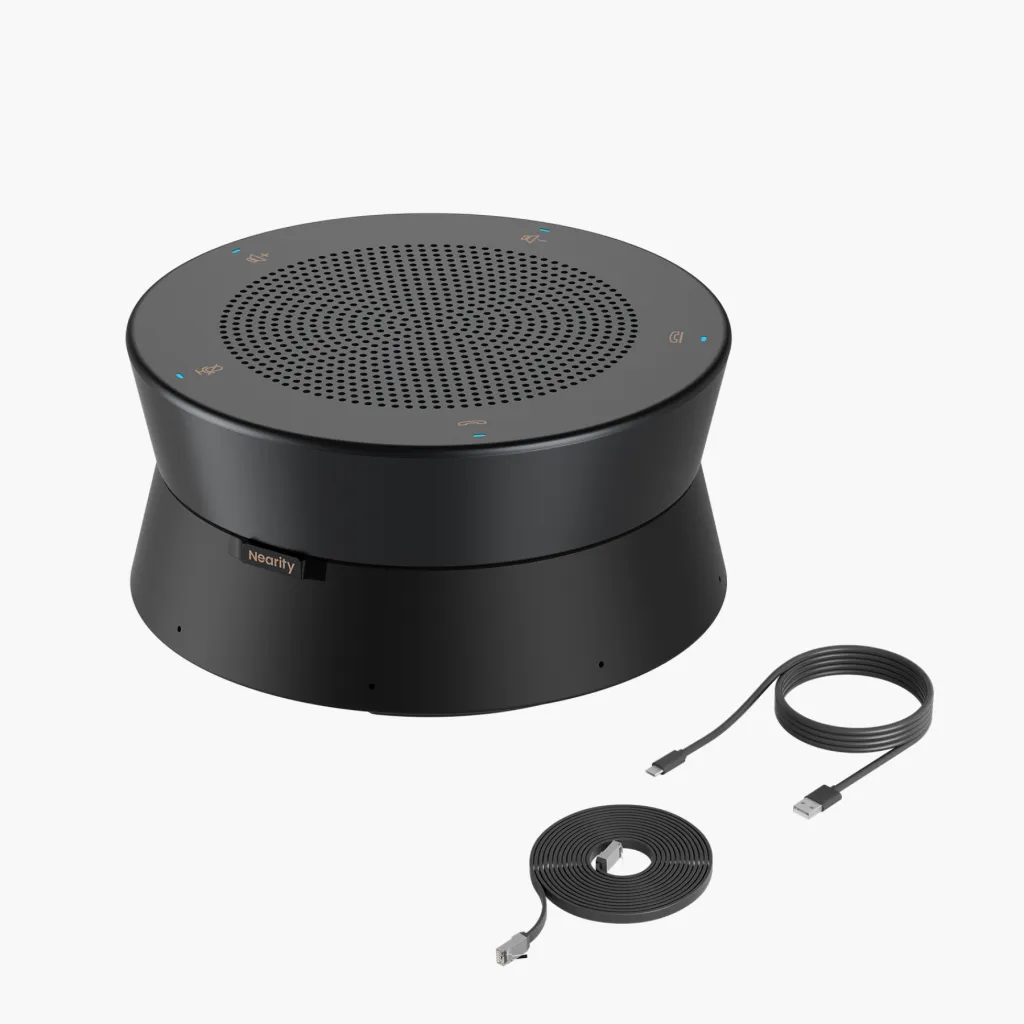
Professional Audio&Pioneering Daisy-Chain
Nearity A20S
4K UHD 120° Webcam for Hybrid Meeting
Nearity V30S
360° All-in-one Camera for Pro Group Chat
Nearity 360 Basic

All-in-one Camera for Group Meeting
Nearity C45
Powerful PTZ Camera with 10x Hybrid Zoom
Nearity V410

Firmware Updater and Device Controller
NearSync
- View products
- Meeting Room
- Meeting Scenario
- Whiteboard


Whether you are coordinating a remote team, teaching an online class, hosting a virtual family gathering, or setting up an interview, knowing how to host a video call is an essential modern skill.
Zoom (now part of the unified Zoom Workplace suite) remains one of the most reliable and widely used video conferencing platforms in the world. However, if you are new to the platform, navigating the interface can feel intimidating.
This comprehensive guide will show you exactly how to set up a zoom meeting, create secure access details, and share your invitation. By the end of this guide, you will be hosting professional virtual meetings with absolute confidence.
Key Takeaways
- Flexible Setup Across Devices: You can easily set up and schedule Zoom meetings using the Zoom Workplace desktop client, mobile app, or directly through integrated platforms like Google Calendar and Microsoft Outlook.
- Security First Approach: To prevent unauthorized disruptions (Zoombombing), always generate a random Meeting ID instead of using your Personal Meeting ID (PMI), and keep both the Waiting Room and Passcode features enabled.
- Effortless Link Sharing: Once a meeting is scheduled, hosts can copy the full invitation details—including the direct URL, meeting ID, and dial-in numbers—with a single click to distribute via email, Slack, or text.
- Enhanced Virtual Efficiency: Optimizing in-meeting settings (like "Mute Participants Upon Entry") and upgrading to professional audio/video hardware (like the 360alien camera or A20S speakerphone) significantly boosts collaboration quality.
What You Need Before Setting Up Your First Zoom Meeting
Before you schedule your first call, make sure you have the necessary tools ready. Preparing these items beforehand prevents last-minute technical delays:
- A Compatible Device: You can use a Windows PC, Mac, Linux computer, iPad, tablet, or smartphone (iOS or Android).
- Audio and Video Hardware: A built-in or external webcam for zoom and a microphone. A standard USB headset or wireless earbuds are highly recommended to prevent echo and improve sound quality.
- A Stable Internet Connection: Zoom recommends a minimum bandwidth of 1.5 to 3.0 Mbps for high-definition video calls.
- A Zoom Account: While anyone can join a Zoom meeting without an account, you must have an account to host and schedule meetings.
Creating Your Free Zoom Account
- Visit the official Zoom signup page.
- Enter your birth year to verify your age, then provide your work or personal email address.
- Check your email inbox for a verification code from Zoom. Enter this code on the registration page.
- Fill in your full name and create a strong password. Click Continue to complete the registration.
With a free "Basic" account, you can host meetings of up to 100 participants for up to 40 minutes per session. If your meetings require longer durations or more advanced features—such as automated AI summaries or cloud storage—you can upgrade to a paid Pro or Business plan.
How to Set Up a Zoom Meeting on a Desktop Computer
The desktop app, also known as the Zoom Workplace desktop client, offers the most robust set of features and controls. We will walk through two ways to establish a meeting on your computer: scheduling a meeting for the future, and launching an instant meeting right away.
Method A: Scheduling a Future Meeting (Recommended)

Scheduling in advance is the best way to keep your calendar organized and give your invitees plenty of notice.
- Open the Zoom App: Launch the Zoom Workplace app on your PC or Mac and sign in.
- Click "Schedule": On the home screen dashboard, locate and click the calendar icon labeled Schedule. A new window filled with configuration options will open.
- Fill in the Meeting Details:
- Topic: Enter a clear, professional title for your meeting (e.g., "Q3 Financial Review" or "Biology 101 Study Group").
- Date & Time: Set the scheduled date, start time, and estimated duration.
- Recurring Meeting: If this call repeats regularly (like a weekly status report), check the Recurring meeting box. This allows you to reuse the exact same link and settings every week.
- Configure Meeting ID & Security:
- Meeting ID: Choose Generate Automatically to create a unique ID for this specific meeting. This is significantly more secure than using your Personal Meeting ID (PMI).
- Passcode: Zoom automatically generates a passcode to restrict access. You can customize this alphanumeric code if you wish.
- Waiting Room: Toggle this option On. It places participants in a virtual waiting area when they join, allowing you (the host) to vet and admit them individually.
- Adjust Video and Audio Settings:
- Video: Select whether you want the host’s and participants' cameras to be turned "On" or "Off" automatically when they join. (Participants can still turn their video on manually during the call).
- Audio: Select Telephone and Computer Audio to allow participants to dial in via landline or use their computer microphones.
- Select Your Calendar Integration: Choose where you want to save the invitation: Google Calendar, Microsoft Outlook, or Zoom's built-in calendar system.
- Save the Meeting: Click the Save or Save Meeting button at the bottom of the window. Zoom will generate the meeting details and sync them with your selected calendar.
Method B: Launching an Instant Meeting
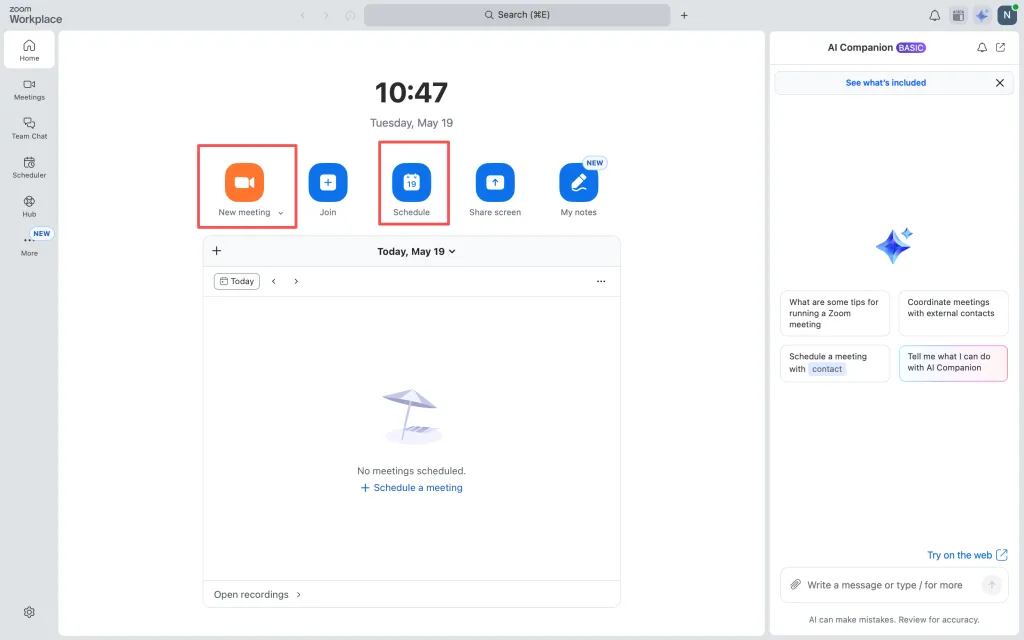
If you need to jump on an immediate call to troubleshoot a problem or have a quick brainstorming session, you can bypass the scheduling step entirely:
- Open the Zoom Workplace desktop app.
- Click the orange New Meeting button.
- Your video window will open immediately. Click Join with Computer Audio.
- To invite someone, click the Participants tab at the bottom toolbar, select Invite at the bottom of the panel, and copy the invitation details to send to your colleague.
How to Set Up a Meeting on Zoom Using a Mobile Device
For professionals and students on the move, learning how to set up a meeting on zoom via the mobile app is incredibly useful. The steps are highly optimized for iOS and Android layouts.
- Install and Log In: Download the Zoom Workplace app from the Apple App Store or Google Play Store. Open it and sign in to your account.
- Tap "Schedule": On the top row of the app's main screen, tap the calendar icon labeled Schedule.
- Configure Your Meeting Parameters:
- Meeting Name: Type a descriptive title.
- Date, From, and To: Set the date, start time, and end time. Double-check that your Time Zone is correct.
- Use Personal Meeting ID (PMI): Keep this toggled off for business or public meetings to preserve your privacy.
- Set Security Preferences:
- Require Meeting Passcode: Ensure this is active.
- Enable Waiting Room: Toggle this green/on to maintain host control over who joins the session.
- Set Meeting Options:
- Scroll down to find camera controls. You can set the host and participant video settings to default to "On" or "Off" upon entry.
- Tap "Save" or "Done": Located in the top-right corner of the screen.
- Add to Calendar: The mobile app will ask for permission to add the event to your device's native calendar (iCal or Google Calendar). Once added, the app will display your meeting link and invitation details.
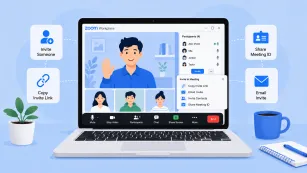
How to Set Up a Zoom Meeting Link and Share It
Once you have successfully configured your settings, the next crucial step is communicating the access information to your participants. Learning how to set up a zoom meeting link and share it correctly prevents confusion and ensures everyone arrives on time.
Where to Find Your Zoom Meeting Link
After you click "Save" on your newly scheduled meeting, Zoom will display a screen summarizing the invitation details. Look for the Invite Link or Join URL.
Copying and Sending the Link
There are three convenient ways to distribute your meeting details:
Option 1: Copy and Paste Manually (Most Common)
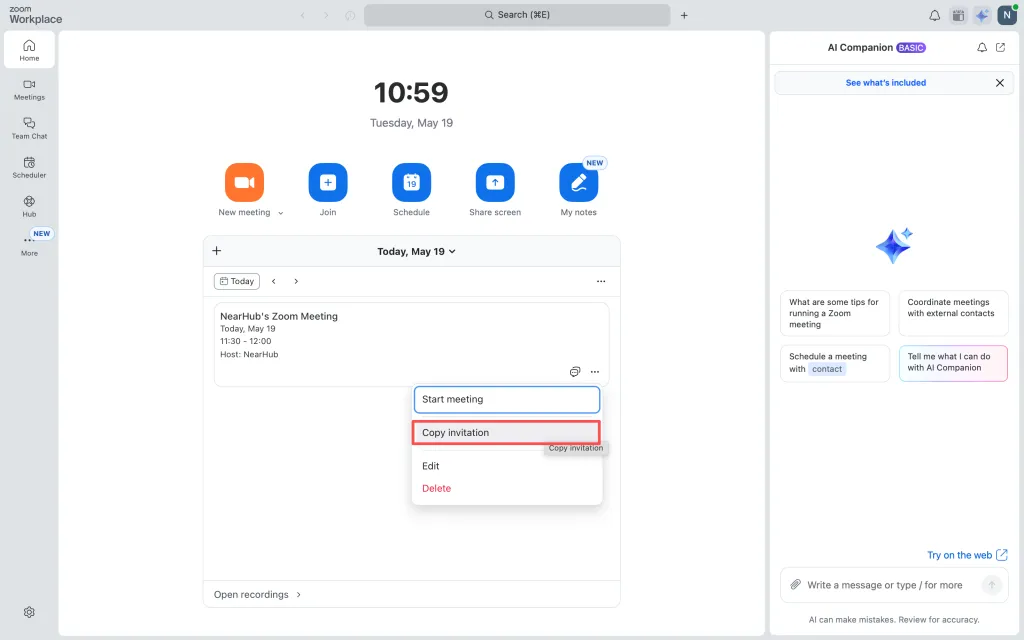
- In the Zoom desktop client, click the Meetings or Calendar tab at the top of the interface.
- Select your scheduled meeting from the left-hand list.
- Click the Copy Invitation button. This copies the entire formal invitation (including the title, date, time, direct link, meeting ID, passcode, and dial-in telephone numbers) to your computer's clipboard.
- Paste this invitation directly into an email, a Slack channel, a Microsoft Teams message, or a text message.
Option 2: Share via Email Calendar Invite
If you selected Google Calendar or Outlook when scheduling, Zoom will automatically open a new browser tab or desktop window displaying your calendar.
- Add the email addresses of your guests to the "Guests" or "To" field.
- Click Save or Send. Your guests will receive a calendar notification containing the Zoom link, which automatically blocks out the time on their personal schedule.
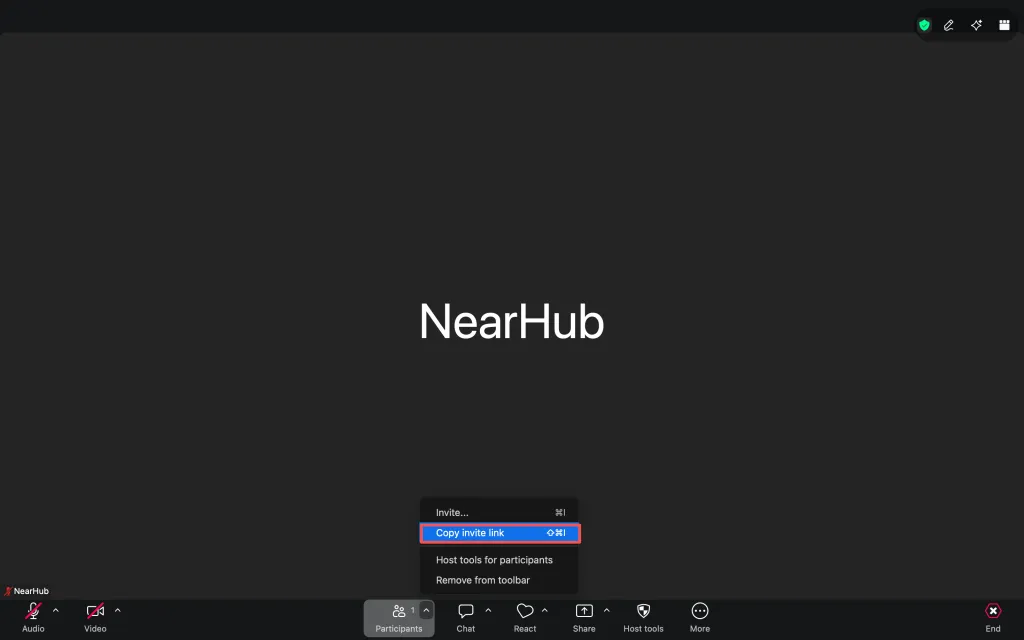
Option 3: Copying the Link During an Active Meeting
If a participant loses their link mid-meeting, you can quickly retrieve it:
- Look at the bottom control bar of your active Zoom call and click Participants.
- At the bottom of the sidebar, click Invite.
- In the pop-up window, click Copy Invite Link at the bottom-left corner.
- Send that link directly to the missing guest via instant message.
Essential Security Settings Every Host Should Use
In recent years, security has become paramount for virtual spaces. Uninvited users joining calls to disrupt them (a phenomenon known as "Zoombombing") can be completely avoided by adjusting a few core settings during your setup phase.
| Setting Name | Recommended State | Why It Matters |
| Waiting Room | Enabled | Prevents participants from entering the call until the host explicitly approves them. |
| Require Passcode | Enabled | Adds a layer of security, keeping random internet searchers from guessing your Meeting ID. |
| Allow Join Before Host | Disabled | Ensures the host is present to manage the environment before anyone else enters the room. |
| Mute Participants Upon Entry | Enabled | Prevents disruptive background noise (dog barking, traffic) when people join late. |
| Screen Sharing Control | Host Only | Restricts screen sharing to the host by default. You can easily grant permission to others during the call if needed. |
Upgrade Your Hardware to Improve Meeting Efficiency
Setting up a meeting smoothly is only half the battle; ensuring the meeting runs efficiently is just as important. Poor audio and disjointed video can drag down productivity, ruin sales pitches, or disrupt online classrooms.
Integrating specialized conference room hardware transforms the experience for remote participants, ensuring a smooth flow of communication.
Enhance Visibility with Smart Conference Cameras
Using standard built-in laptop webcams often limits the field of view, making it hard to see everyone in a conference room. High-quality conference cameras solve this completely:
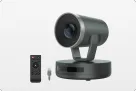
- Nearity 360 Alien (360-degree Round-Table Camera): Perfect for round-table layouts and collaborative boardrooms. The 360 Alien panoramic camera sits in the center of the table, capturing everyone in the room simultaneously and automatically tracking the active speaker so remote participants never feel excluded.
- Nearity V30S (Compact/Huddle Room Camera): For small-to-medium meeting rooms, the V30S offers high-definition 4K visuals, wide-angle distortion-free imaging, and smart framing to keep your local team centered on the screen.

Ensure Perfect Audio Clarity
If your remote participants struggle to hear you, efficiency plummets. Standard microphones can pick up confusing ambient noise while cutting out the voices of those sitting further from the screen.
- Nearity A20S Speakerphone: To guarantee that the other party hears every word with absolute precision, the A20S features full-duplex audio and advanced noise-canceling technology. It picks up clear, natural sound from all directions while actively filtering out static, Echo, and background rustling, making your audio output sound completely professional.
How to Start Your Scheduled Zoom Meeting as the Host
When the day of your meeting arrives, you need to initiate the call as the official host to unlock full administrative controls (like admitting people from the waiting room and muting participants).
On Desktop:
- Open the Zoom Workplace app and log in.
- Click the Meetings or Calendar tab.
- Find your scheduled meeting in the list.
- Click the blue Start button next to the meeting title.
On Mobile:
- Open the Zoom app.
- Tap the Meetings tab at the bottom of your screen.
- Locate today's meeting and tap Start on the meeting card.
Common Zoom Setup Mistakes to Avoid
Even seasoned remote workers occasionally make setup mistakes. Watch out for these common pitfalls to keep your online calls seamless:
- Sharing Your Personal Meeting ID (PMI) Publicly: Your PMI is like your home address; anyone with the link can walk in at any time. Only use randomly generated Meeting IDs for business calls, public webinars, or student classes.
- Forgetting to Set the Correct Time Zone: If you schedule a meeting in Pacific Time but your client is in Eastern Time, misunderstandings are inevitable. Always double-check the time zone dropdown menu when scheduling.
- Assuming Guests Have the Desktop App: Always remind your participants that they can join a Zoom meeting via their web browser if they are on a locked corporate computer and cannot download the desktop client.
- Neglecting the "Mute Upon Entry" Feature: For large webinars or lessons, failing to mute participants on entry can result in an overwhelming wall of feedback and background chatter.
Conclusion: Host Your Next Zoom Call with Confidence
Now that you know how to set up a zoom meeting and which hardware facilities like the Nearity 360 Alien or A20S can help you communicate more effectively, you are ready to host professional, efficient virtual sessions. With the right software settings and professional-grade equipment, your virtual meetings will be as productive as being there in person.
FAQs
1. How do I change my display name when setting up or joining a meeting?
If you want to edit your name before a meeting starts:
- Open the Zoom Workplace desktop client and click your Profile Picture in the top-right corner.
- Select My Profile—this will take you to your Zoom web portal.
- Click Edit next to your name to change how it displays to others. Alternatively, if you are joining a meeting via link, a prompt will appear asking you to type your display name before you click Join. Type your preferred name here to change it for that specific call.
2. How do I raise my hand during a Zoom meeting?
If you are a participant and want to speak or ask a question without interrupting the flow of the meeting, use the "Raise Hand" tool:
- Locate the control bar at the bottom of your active meeting window.
- Click the Reactions button (the smiley face icon).
- Click Raise Hand. A hand icon will appear next to your video feed and your name in the participant list, alerting the host. Once your question is addressed, go back to the Reactions menu and click Lower Hand.
3. How do I schedule a Zoom meeting directly in Microsoft Outlook?
You can easily schedule Zoom calls inside Outlook using the Zoom for Outlook add-in:
- Open Outlook and navigate to your Calendar.
- Create a New Event or New Meeting.
- In the toolbar ribbon at the top of the event window, look for the Zoom icon and click Add a Zoom Meeting. (If you do not see it, go to the Outlook Add-ins store, search for "Zoom for Outlook", and install it).
- Log into your Zoom account when prompted. The Zoom meeting details, including the meeting link and passcode, will automatically populate into the body of your Outlook invitation.