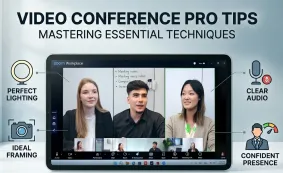


In today’s digital age, Zoom Bible study groups are revolutionizing how believers connect for spiritual growth. This article discusses the top conference cameras, specifically 360° models, to ensure high-quality, immersive experiences. 360-degree conference cameras improve video clarity, audio fidelity, and interactivity, making virtual Bible studies more engaging. Learn how to set up these cameras, optimize Zoom settings, and provide a professional, dynamic atmosphere for online faith gatherings.
What is Zoom Bible Study?
In today’s fast-paced, tech-driven world, the traditional ways of connecting for spiritual growth are evolving. Zoom Bible Study has become one of the most popular and effective ways for people to gather virtually, breaking down geographic barriers and offering a flexible solution for those looking to connect with their faith communities.
The Rise of Virtual Faith Communities
As society changes, so does the way we practice our faith. Recent trends show that while the percentage of U.S. adults identifying as Christians has declined from 78% in 2007 to 62% today (according to a Pew Research Center study), the desire to stay engaged with one’s faith remains strong. In fact, the Christian share of the U.S. adult population has held steady since 2019, suggesting that faith communities are still very much a part of people’s lives, even as cultural shifts continue.
However, attending in-person Bible study isn’t always feasible for everyone. Whether it’s due to distance, scheduling conflicts, or other challenges, many people find it difficult to make it to a church for traditional Bible study sessions. Zoom Bible study groups address this issue by allowing individuals to participate remotely, making it easier for anyone to stay connected to their faith and community.
Whether you're looking for an online Catholic Bible study group on Zoom, or you’re searching for Zoom Bible study groups near me, these virtual gatherings offer the flexibility and accessibility that modern-day believers need to engage meaningfully with their spiritual journey.
Why is a 360 Conference Camera Perfect for Zoom Bible Study?
So, you’re ready to dive into a Zoom Bible study but what if the technology isn’t up to par? You know, poor audio quality, choppy video, or maybe the people at home can’t see or hear the discussions clearly? This is where a 360 conference camera comes in to elevate the experience for everyone involved.
A 360-degree conference camera ensures that no matter where you are in the room, everyone is seen and heard clearly. Imagine sitting in the comfort of your home, attending Bible study with your church group, and having an experience as if you were all in the same room.
With its advanced tracking capabilities, the camera will follow the active speaker, whether they're sitting at the front of the group or moving around. This makes for a much more immersive and engaging experience—perfect for any type of online Bible study group on Zoom.
Best Conference Room Camera for Zoom Bible Study
When selecting the best conference room camera for your Zoom Bible study sessions, it is essential to prioritize high-quality video and audio, as well as seamless integration with Zoom. Below are three of the top conference cameras ideal for your virtual Bible study group:
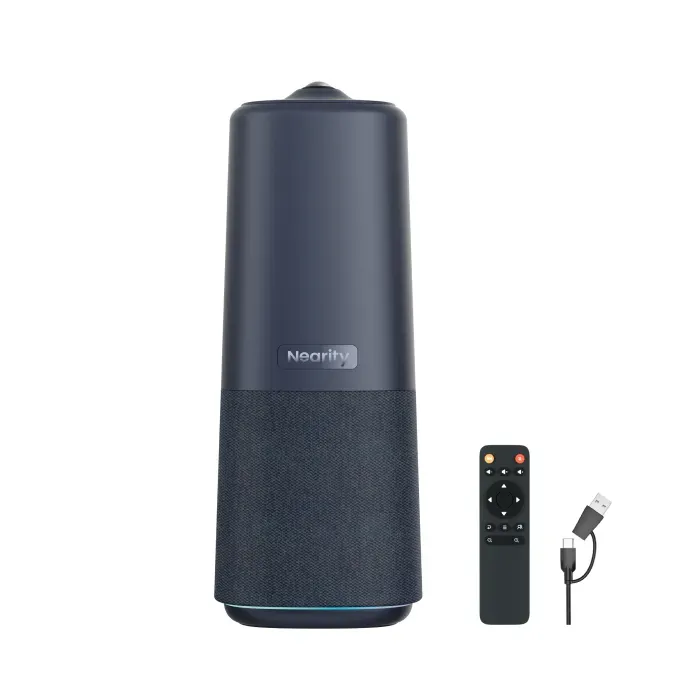
1. Nearity C50
The Nearity C50 stands out as an excellent 360° camera for Zoom Bible study due to its immersive video and audio capabilities. Equipped with a 1080P fisheye lens, the camera captures a full panoramic view of the room, ensuring that all participants can be seen clearly, creating a natural, face-to-face interaction. The Nearity C50 offers three AI-powered capture modes tailored for group discussions, making it ideal for any Bible study format:
Discussion Mode: Focuses on up to three participants in close-up, ensuring everyone is equally visible during group discussions.
Global Mode: Captures content within a 115° field of view without adjusting the video, perfect for structured sessions where group interaction is key.
Presentation Mode: Automatically highlights the active speaker, ensuring they are always the focal point during teaching sessions.
The C50 also features six omnidirectional microphones that capture clear audio from up to 6 meters away, as well as a Hi-Fi full-duplex speaker to minimize background noise and echo. This makes it an excellent choice for clear communication in your virtual Bible study group. The camera is also plug-and-play with USB connectivity, making setup quick and easy. No software is required, and it’s compatible with a variety of platforms, including Zoom, Teams, and Google Meet.
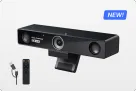
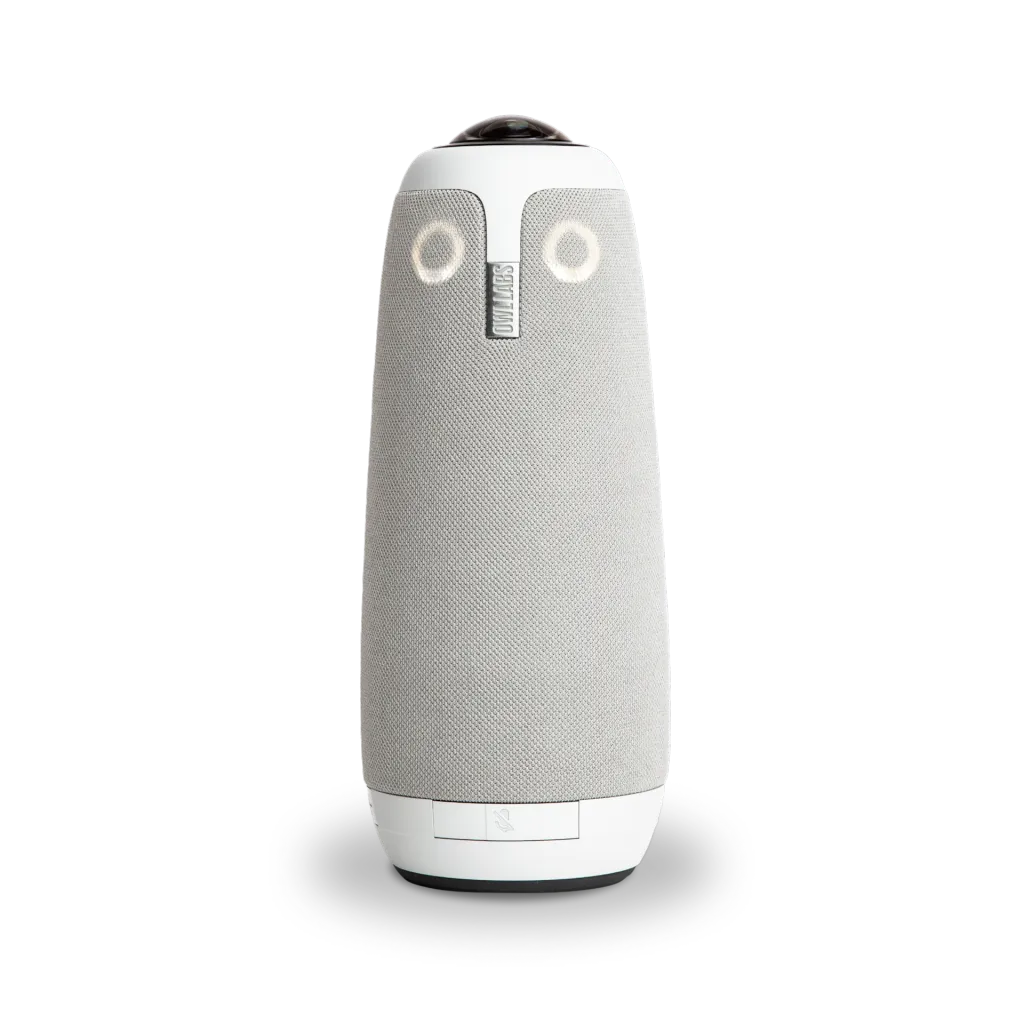
2. Meeting Owl 3
The Meeting Owl 3 is another great choice for Zoom Bible study, especially if you need an immersive experience that captures the entire room. The Owl 3 uses a 360° panoramic camera that automatically tracks the active speaker and zooms in on them, ensuring that every participant feels included in the conversation.
Key features include:
360° Camera: Captures a full 10-foot radius in 1080p, so no one is left out of the frame.
Intelligent Tracking: The camera auto-tracks whoever is speaking, making sure their image is always in focus.
360° Tri-Speaker: The built-in speaker system ensures that all voices are heard clearly, even from large distances (up to 18 feet/5.5 meters).
This camera is ideal for creating an organic, hybrid experience where in-person and remote participants feel equally engaged. The Owl 3’s built-in microphones pick up audio from all directions, and the camera’s 360° capability ensures that everyone in the room is captured clearly, making it perfect for larger group discussions during Bible study.
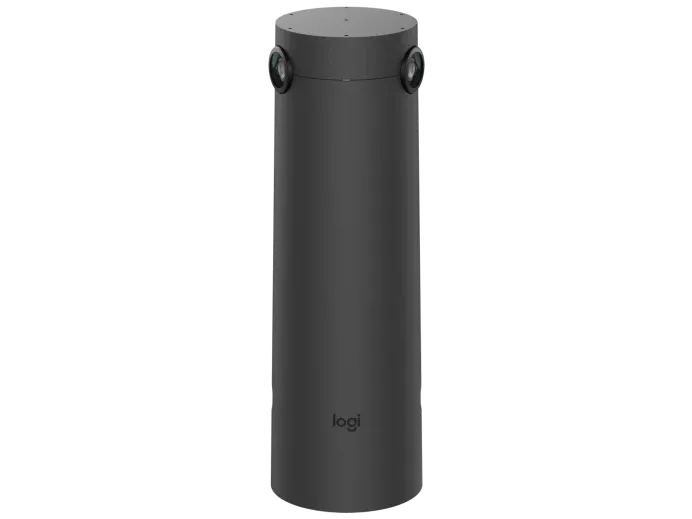
3. Logitech Sight
The Logitech Sight offers a more focused approach for those who want to ensure that remote attendees feel like they are seated at the table. This AI-powered camera adjusts to the room’s dynamics and intelligently frames multiple participants to keep everyone visible.
AI-Powered Framing: Ensures that remote participants see the best angle of in-person attendees, making them feel included in the discussion.
Dual Viewpoints: When paired with the Logitech Rally Bar at the front of the room, Logitech Sight provides two distinct viewpoints, ensuring that both in-room and remote participants get a consistent, front-facing view of the meeting.
Crystal Clear Audio: The camera integrates with Smart Gallery to deliver clear audio, ensuring that all attendees, whether in-person or remote, can hear each other without issues.
The Logitech Sight is ideal for smaller groups who need clear, focused interaction between in-room and remote attendees. It provides an excellent combination of video and audio quality but might struggle in maintaining a consistent head-on view if participants turn away from the front.
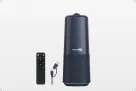
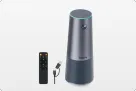
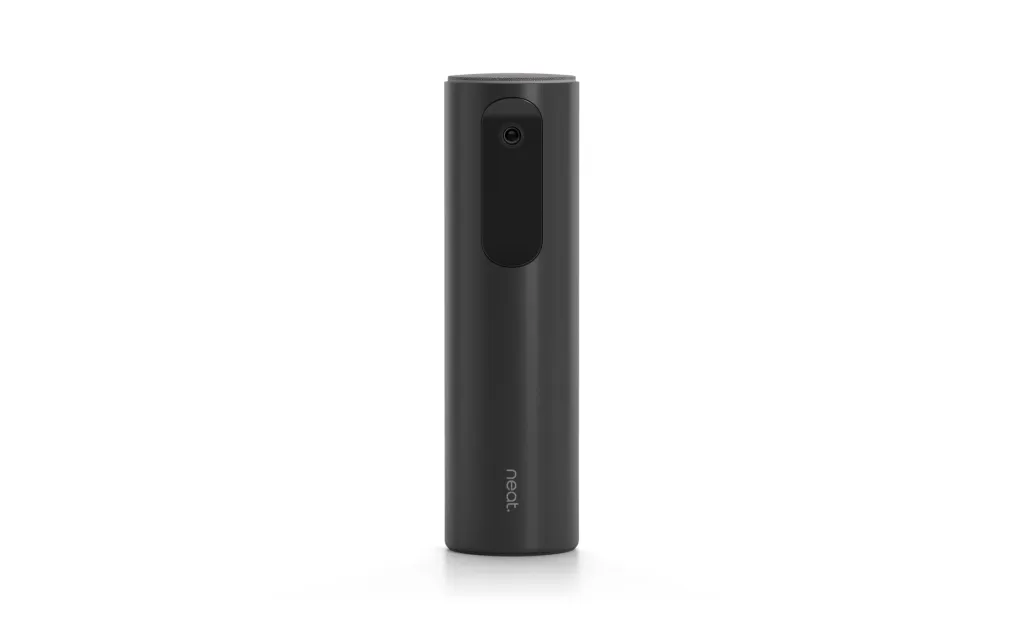
4. Neat Center
The Neat Center offers an ultra-modern approach to virtual meetings, with a sleek design that seamlessly integrates into any space. This compact yet powerful camera is designed to enhance group collaboration, making it ideal for Zoom Bible studies.
With built-in AI features, the Neat Center ensures that speakers are clearly visible and heard, no matter where they are in the room. This camera automatically adjusts the framing based on the number of people in the room, keeping everyone in focus. Directly compatible with Zoom, the Neat Center offers a simple plug-and-play setup with exceptional video and audio quality.
Here’s a handy comparison table of the conference cameras mentioned above:
Camera Model | Price | Video Quality | Microphone Quality | Easy to Buy |
| Owl Labs Meeting Owl 3 | $1,049 | 1080p HD, 360° video | 8 omni-directional beamforming Smart Mics, Audio Pickup Radius: 18’ (5.5m) | Available directly or via resellers |
| Nearity C50 | $665.00 | 1080p HD, 360° video | 6 Omnidirectional Microphones, voices captured from up to 6 meters away with excellent noise-cancelling capabilities | Available online and via resellers |
| Logitech Sight | $2,099 | 4k, 315° Field of View | 7 omnidirectional digital MEMS microphones forming six adaptive acoustic endfire beams Pickup Range: 2.3 m radius | Available online and via resellers |
| Neat Center | unpublished | 1080p HD, 360° video | Beamforming 16-Mic Array, Microphone range:3.0 m | Offline Only |
How to Use These Cameras for Zoom Bible Study (Example: Nearity C50)
Using a 360° camera like the Nearity C50 for your Zoom Bible study not only enhances the overall experience but also makes virtual participation more interactive and seamless. Below, we’ll walk through the detailed steps for setting up and using the camera effectively, as well as some important Zoom settings and preparation tips to ensure your Bible study is smooth and engaging.
1. Setting Up the Nearity C50 Camera
Step 1: Connect the Camera
Plug the Nearity C50 camera into your computer via the provided USB cable.
Ensure that your computer recognizes the device. No drivers are required as it is a plug-and-play device.
Step 2: Select the Camera in Zoom Settings
Open Zoom and go to Settings (gear icon in the top right).
In the Video Settings section, you will see a dropdown list for camera options. Select Nearity C50 from this list.
Test the camera to ensure it’s functioning correctly. You should see the 360° view of your room.
Step 3: Test Audio Settings
In the Audio Settings section, make sure the Nearity C50’s microphones are selected as the default audio source.
Test audio to ensure that sound is clear and picked up from around the room (up to 6 meters).
2. Preparing for the Bible Study Session
Step 1: Create a Zoom Meeting
Open the Zoom app and click on Schedule a Meeting.
Set the date and time for the Bible study. You can also enable the option to recurring meeting if you want this Bible study to happen weekly or at regular intervals.
In the Meeting Settings, make sure to:
Enable video for both host and participants.
Enable audio options to allow for participants to join via computer audio or telephone.
Enable waiting room to control when participants can join the session.
Consider requiring a meeting password to secure the session.
Set Join before host to “On” if you want early attendees to join before the host starts.
Step 2: Share the Meeting Link
After saving the meeting, you’ll be presented with a unique meeting link (e.g.,
https://zoom.us/j/1234567890).Send the link to your Bible study group via email or messaging apps like WhatsApp. Be sure to include any passwords (if enabled) and specific instructions about the session (i.e., what scripture you’ll be discussing).
Step 3: Prepare for the Bible Study
Set up your study space to ensure a clean and distraction-free background. If your camera supports it, use background blur or a virtual background to maintain a professional environment.
Prepare any Bible study materials in advance, such as:
Bible passages.
Reflection notes or study guides.
Prayer lists.
A shared document for group notes (you can use Google Docs or a Zoom whiteboard).
Step 4: Prepare to Share Content
If you plan to share slides or images, open those documents or have them ready in advance.
You can share your screen by clicking the Share Screen button on Zoom and selecting the relevant window.
Make sure the Nearity C50’s camera is adjusted properly to ensure participants can see you and any group members, as well as anything you are sharing on screen.
3. During the Zoom Bible Study Session
Step 1: Start the Meeting
Click Start on the meeting screen. This will allow you to launch your Bible study session.
As the host, make sure to admit participants from the waiting room when the meeting begins.
Step 2: Use Nearity C50’s Features
Once the meeting is live, the Nearity C50 will automatically adjust based on the mode you selected (e.g., Discussion Mode, Global Mode, or Presentation Mode).
For larger groups, Global Mode might be best, as it provides a wide-angle view of everyone.
During group discussions, Discussion Mode will focus on individuals, making it easier for everyone to see who is talking.
If someone is teaching or leading a segment, switch to Presentation Mode to automatically highlight the speaker.
Step 3: Engage Remote Participants
Encourage remote participants to keep their cameras on so everyone can engage and connect visually.
Use Zoom’s Breakout Rooms if you want to split participants into smaller groups for deeper discussion.
Step 4: Sharing Scripture or Notes
If you’re sharing scripture or study materials, use the Screen Share function to display slides or Bible passages. You can also use the Whiteboard feature in Zoom to draw diagrams or write down key points.
Step 5: Record the Session (Optional)
If you want to record the meeting for later viewing, click on the Record button at the bottom of your Zoom screen. This is especially useful for group members who may not be able to attend in real-time.
Step 6: Encourage Interaction
Use Zoom’s chat feature to allow remote participants to ask questions or contribute to the discussion.
Consider using polls to gather insights or feedback from participants, especially if you are discussing particular themes or prayer requests.
4. Ending the Session and Follow-Up
Step 1: End the Meeting
As the host, click End Meeting in the lower right corner. You can choose to end the meeting for all participants or leave the meeting open for others.
Step 2: Share the Recording (Optional)
If you recorded the session, Zoom will automatically save the recording to your computer or to the cloud, depending on your settings.
You can send the recording link to group members who were unable to attend. This allows them to catch up on the discussion at their convenience.
Step 3: Send Follow-Up Materials
Send out any follow-up materials such as:
Bible study notes or guides.
Prayer requests or updates.
Announcements for the next meeting.
Step 4: Set Up the Next Meeting
If your Bible study meets regularly, be sure to schedule the next session in advance and send out the new meeting link.
Additional Tips for Enhancing Your Zoom Bible Study Experience:
Use a Second Screen: If you’re sharing content or managing multiple participants, having a second screen can make it easier to monitor the Zoom meeting and interact with participants without switching between apps.
Good Lighting: Ensure you have proper lighting. Good lighting helps your video appear clearer, making the virtual interaction feel more personal.
Interactive Features: Consider using Zoom’s reactions (thumbs up, claps, etc.) to encourage positive feedback during discussions. This can help remote participants feel more engaged.
By setting up and using the right other 360° camera in this way, you will create a truly immersive and engaging experience for your Bible study group, ensuring that both in-person and remote participants can connect, engage, and grow in faith together.
Conclusion: Elevating Your Virtual Bible Study Experience
As virtual Bible studies continue to bridge the gap between believers from all walks of life, the right technology plays a crucial role in ensuring meaningful connections. Among the many excellent options available, 360° conference cameras like the Nearity C50, Meeting Owl 3, Logitech Sight, and Neat Center all offer exceptional features to enhance your Zoom Bible study. However, if you're looking for a well-rounded solution that combines cutting-edge video and audio capabilities, the Nearity C50 may just be the best choice for your needs.
While it offers superior video and audio capabilities like AI-powered tracking, a panoramic 1080p fisheye lens, and clear omnidirectional microphones, it remains reasonably priced, making it a highly accessible choice for many faith communities.Compared to other high-end options, the Nearity C50 offers great value, providing a professional-grade experience without breaking the bank. This makes it an ideal solution for churches, Bible study groups, or individuals who want to enhance their virtual gatherings without stretching their budgets. Whether you’re in a small group or hosting a larger gathering, the Nearity C50 ensures that everyone feels seen and heard clearly, delivering an interactive experience that will keep your community engaged.