
- View products

Windows OS (2nd Gen)
NearHub Board Max

Windows OS
NearHub Board S Pro

For Huddle Rooms
NearHub Board S55

For Medium Rooms
NearHub Board S65

For Large Rooms
NearHub Board S75

For Broad Rooms
NearHub Board S86

Smart Digital Photo Frame with Air Quality Monitor
NearHub Frames 10

USB Drawing Tablet
NearHub MagicPad ST1160

Real-time Online Whiteboard
NearHub Canvas

Digital Signage and Batch Management
NearRooms
- View products

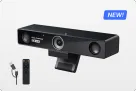
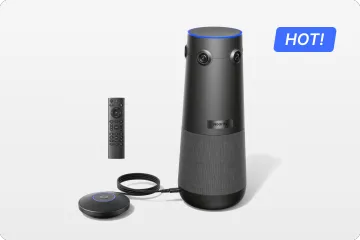
True 4K 360° All-in-1 Camera for Hybrid Meetings
Nearity 360 Alien

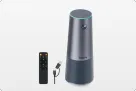
True 4K 120° All-in-1 Camera for Team Collaboration
Nearity 120 Max

Professional Audio&Pioneering Daisy-Chain
Nearity A20S
4K UHD 120° Webcam for Hybrid Meeting
Nearity V30S
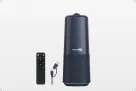
360° All-in-one Camera for Pro Group Chat
Nearity 360 Basic
All-in-one Camera for Group Meeting
Nearity C45
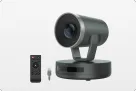
Powerful PTZ Camera with 10x Hybrid Zoom
Nearity V410

Firmware Updater and Device Controller
NearSync
- View products
- Meeting Room
- Meeting Scenario
- Whiteboard


Have you ever walked into a classroom or conference room and felt a mix of excitement and apprehension when you saw a smart board? That moment when you're ready to share your ideas, but you're not entirely sure how the technology works. The buttons seem unfamiliar, the pen is a mystery, and the thought of fumbling with the settings in front of an audience can be a bit intimidating. If you've ever felt that a smart board's potential was just out of your reach because you didn't know the first steps to using it, you're not alone.
This feeling of techno-anxiety is a common pain point for beginners and even experienced educators and professionals. But what if there was a simple, clear guide to demystifying this powerful tool? This comprehensive article is designed to be your go-to resource, providing you with a step-by-step roadmap on how to operate a smart board with confidence and ease. We'll break down the process from the very basics—turning it on—to the more advanced features that can truly transform your lessons and presentations.
By the time you finish reading, you'll feel empowered and ready to unleash the full potential of your interactive display. We'll walk you through the essential components, the core functions, and the best practices that will make using a smart board a natural and intuitive part of your daily routine. Whether you're an educator looking to create more engaging lessons or a business professional aiming for more dynamic presentations, this guide will show you how to work a smart board like a pro. Let's get started on your journey to smart board mastery!
Key Takeaways
- Master the Power-Up Process: Learn the essential steps on how to turn on a smart board, from locating the hidden master rocker switch to identifying the main power button on the bezel.
- Establish Correct Connections: Understand the importance of connecting both HDMI/USB-C and the specific USB touch cable to ensure your computer interacts correctly with the display.
- Solve Common Startup Queries: We answer the frequently asked question, "how do you turn on a smart board," covering both external laptop connections and built-in OPS computer startups.
- Navigate Core Functions: Gain confidence in using digital pens, calibrating older screens for touch accuracy, and using erasure tools effectively during presentations.
- Unlock Advanced Features: Go beyond the basics by utilizing wireless screen sharing, saving annotations, and integrating video conferencing tools for hybrid collaboration.
The Basics: What You Need to Know Before You Operate a Smart Board
Before we dive into the step-by-step process, it's crucial to understand the fundamental components and the initial setup. Knowing what's what will make the rest of the learning process much smoother.
Understanding the Hardware
A typical smart board setup, especially an interactive flat panel (IFP) display, consists of a few key pieces of hardware:
- The Interactive Display: This is the large, flat-panel screen itself. It's where all the magic happens.
- The Power Button: Usually located on the front, side, or bottom of the display. This is your first point of interaction.
- The Pen Tray/Holder: This is where the pens or styluses are stored. For some older smart boards, picking up a pen from the tray can trigger certain software actions.
- The Cables: These connect the smart board to your computer, power source, and potentially other peripherals like speakers or cameras. The most common connections are HDMI, USB, and a power cable.
- A Connected Computer: This is often the brain of the operation. Most smart boards require a computer to run software, display files, and access the internet. Some modern displays, like our smart digital whiteboard, have a built-in computer, or OPS (Open Pluggable Specification), which simplifies the setup process. You can learn more about our advanced displays here: smart digital whiteboard.
The Crucial First Steps: How to Turn On a Smart Board
The first hurdle for many beginners is simply getting the system running. A common question we receive is: how do you turn on a smart board correctly? While it seems straightforward, different models have different power protocols.
Here is a detailed guide on how to turn on smart board systems to ensure a smooth start to your presentation:
- Check the Master Switch: Some interactive flat panels have a rocker switch (master power switch) located near the power cable socket on the back or bottom of the unit. Ensure this is flipped to the "I" (On) position.
- Locate the Power Button: Find the main power button on the display. It is often located on the bottom right bezel or the front control panel and is indicated by a power icon.
- Power Up: Press the power button once. You should see the status light change color (typically from red to green or blue), indicating the board is booting up.
- Turn on Your Computer: If your smart board relies on an external computer, make sure to turn that on as well. If you are using a board with a built-in OPS computer, turning on the screen will usually boot up the system automatically.
- Connect Your Device: If you are using an external laptop, connect it to the smart board using an HDMI or USB-C cable. Don't forget to connect the USB touch cable if you are using HDMI; this is the crucial link that allows the smart board's touch function to work with your computer.
- Select the Correct Input: Use the remote control or the on-screen menu to select the active input source (e.g., HDMI 1, USB-C). You should see your computer's screen mirrored on the smart board.

With these initial steps, you've successfully established a basic connection and are ready to start interacting. This is a foundational skill for anyone looking to understand how to operate a smart board.

The Step-by-Step Guide on How to Operate a Smart Board: From Basics to Beyond
Now that the hardware is ready, let's walk through the core functions that you'll use every day, whether in a classroom or a business meeting.
Step 1: Calibration (If Necessary)
For many older smart boards and projector-based systems, calibration is a crucial first step. Calibration ensures that your touch input aligns perfectly with the content on the screen.
- Initiate Calibration: Look for a dedicated calibration button on the smart board, or find the calibration option in the on-screen menu.
- Follow the Prompts: The screen will typically display a series of crosshairs or dots. Using your finger or the smart board pen, touch each point accurately as it appears. Once all points have been touched, the calibration is complete, and your touch will be perfectly aligned.
- Modern Displays: Many newer IFPs (Interactive Flat Panels) feature auto-calibration or are designed in a way that requires no calibration at all, simplifying the process.
Step 2: Using the Digital Pens and Eraser
The smart board pen is your primary tool for interaction. Knowing how to use it is key to understanding how to use a smart board.
- The Pen: Simply pick up a pen from the tray. Depending on your smart board model, this might automatically launch a writing tool or activate a specific color. Use the pen to write, draw, or annotate directly on the screen.
- The Eraser: For quick corrections, many smart board pens have an eraser on the other end. For larger mistakes, a dedicated eraser tool (often a larger, block-shaped object) can be used to quickly clear a section of the screen.
- Digital Tools: Your smart board's software will have a digital toolbox. This usually includes various pen types (e.g., fine-tip, highlighter), different colors, and an eraser tool that you can select from the on-screen menu.
Step 3: Annotating and Saving Your Work
The ability to save and share your work is a key advantage of using a smart board over a traditional whiteboard.
- Annotating: You can write or draw on top of any file or application that is displayed on the screen—a presentation, a website, a document, or an image. The smart board's software will capture these annotations as a layer on top of your content.
- Saving: When you're finished, you can save your annotated session. The software will often give you options to save the file as a PDF, an image, or a proprietary file type that can be opened and edited later. This is incredibly useful for creating and distributing meeting notes or lesson summaries.
Step 4: Mastering Basic Gestures and Tools
To truly understand how to work a smart board, you need to be comfortable with the basic gestures and tools.
- Finger Touch: Use your fingers for navigation, just like on a tablet. You can tap to open applications, swipe to move between pages, and pinch to zoom in or out.
- Multi-touch: Many smart boards support multi-touch, allowing two or more people to interact with the screen simultaneously. Two-finger gestures are often used for zooming or panning.
- Digital Tools: Become familiar with the on-screen toolbar. This typically includes a pen, an eraser, a select tool (to move objects), and a variety of shapes and colors. The more you practice with these tools, the more natural they will feel.
By following these steps, you'll be able to confidently handle the most common tasks and make the most of your interactive display.

Optimizing Your Experience: Advanced Tips for How to Use a Smart Board
Once you've got the basics down, you can move on to more advanced techniques that will make your presentations and lessons even more engaging and effective.
A. Screen Sharing and Wireless Connectivity
In today's hybrid environments, wireless screen sharing is a game-changer.
- Built-in Casting: Many modern smart boards have built-in wireless casting capabilities (e.g., Miracast, AirPlay, or a proprietary app). This allows you and your students or colleagues to instantly share content from your laptops, tablets, or phones without fumbling with cables.
- Multi-Screen Sharing: Some systems allow for multiple devices to be cast to the screen at the same time, which is perfect for comparing work, collaborating on documents, or showing different perspectives simultaneously. This kind of functionality is a key feature of powerful systems like our smart boards for business and our Nearhub smart digital whiteboard.
B. The Power of Software Integration
The software that runs on your smart board is just as important as the hardware.
- Native Software: Master your smart board's native software (e.g., SMART Notebook, Promethean ActivInspire, Nearhub Canvas). These programs are optimized to work flawlessly with the display and offer a wealth of features for creating interactive lessons and presentations.
- Third-Party Apps: Modern smart boards are essentially giant tablets. This means you can download and use a wide range of third-party apps, from educational games to project management software. This allows you to tailor the smart board to your specific needs.
- File Compatibility: Make sure you know how to open and save common file types (like PDFs, PowerPoint, and Word documents) on the smart board. The ability to annotate directly on these files is a massive advantage. For more information on this, you can check out our detailed guide on how to use a smartboard and its software to its full potential.
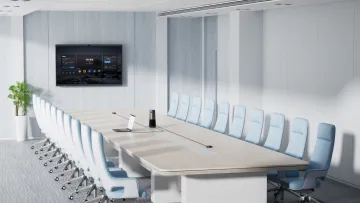
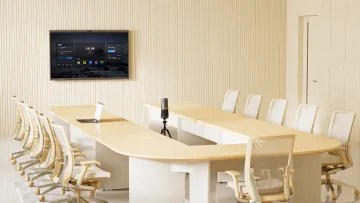
C. Utilizing the Smart Board for Remote Collaboration
A smart board isn't just for people in the same room. It's a powerful tool for bridging the gap between in-person and remote participants.
- Integrated Video Conferencing: Many smart boards have built-in cameras and microphones or can easily be connected to external ones. This allows you to host a video conference (via Zoom, Microsoft Teams, etc.) and share your interactive screen with remote participants.
- Remote Annotation: With the right software, remote participants can not only see what you're doing on the smart board but can also use their own cursors to write, draw, or annotate in real-time, creating a truly collaborative hybrid environment.
How to Work a Smart Board for Different Audiences: Tailoring Your Approach
The way you use a smart board can and should be adapted to your audience. The goal is always engagement, but the methods might differ.
For Educators: Fostering Student Engagement
A smart board in the classroom is an incredible tool for making learning interactive and fun.
- Interactive Lessons: Move beyond static lectures. Use the smart board to run educational games, show interactive timelines, or use virtual manipulatives for math and science.
- Student Participation: Encourage students to come up to the board to solve problems, draw diagrams, or present their work. This hands-on experience can significantly boost retention and confidence.
- Multimedia Integration: Seamlessly integrate videos, audio clips, and interactive websites into your lessons to appeal to different learning styles.
For more detailed tips on effective classroom use, our blog post on how to work a smartboard is an invaluable resource.
For Business Professionals: Elevating Meetings and Presentations
In the business world, a smart board can make your meetings more efficient and your presentations more impactful.
- Dynamic Brainstorming: Use the digital whiteboard feature to conduct a live brainstorming session. Everyone can contribute their ideas, and you can organize and save them instantly.
- Live Data Analysis: Instead of a static chart, display live data dashboards on the smart board. You can drill down into specific metrics and annotate key trends in real-time.
- Annotated Presentations: During a client presentation, you can annotate directly on your slides to emphasize key points or answer questions on the fly. You can then save and email the annotated presentation to the client for easy reference.
For businesses looking to fully leverage this technology, our smart boards for business product pages offer detailed information and use-case examples.

Troubleshooting Common Issues When Operating a Smart Board
Even with the best preparation, you might encounter a few minor issues. Knowing how to quickly troubleshoot them is part of understanding how to operate a smart board confidently.
| Problem | Possible Cause | Solution |
| Touch input is inaccurate | The smart board is not calibrated correctly. | Recalibrate the smart board by following the on-screen prompts. |
| Pen is not writing | The smart board is not connected to the computer via USB. | Ensure the USB cable is securely connected to both the smart board and the computer. |
| No display on the screen | The wrong input source is selected, or the HDMI/video cable is loose. | Check that the correct input source (e.g., HDMI 1) is selected in the menu. Securely re-plug the HDMI cable. |
| Slow or laggy response | The computer connected to the smart board is running too many programs or needs an update. | Close unnecessary applications on your computer. Restart the computer and the smart board. Ensure all drivers and software are up to date. |
| Can't save annotations | The software is not active or there's a file permissions issue. | Ensure you are using the smart board's native software for annotation and saving. Check your computer's file save permissions. |
Most common issues are easily resolved with a quick check of the connections and settings. With a bit of practice, troubleshooting will become second nature.
Frequently Asked Questions about How to Operate a Smart Board
Q1: How do you turn a smart board on?
A1: To turn on a smart board, simply locate the power button on the display. It's usually on the front, side, or bottom and is marked with a power icon. Press it once and wait for the screen to boot up.
Q2: How do you connect a computer to a smart board?
A2: You connect a computer to a smart board using two main cables: an HDMI cable for the video signal and a USB cable for the touch functionality. Plug both into the smart board and your computer. Then, on the smart board, use the menu to select the correct input source (e.g., HDMI 1).
Q3: Can I use a smart board without a computer?
A3: Yes, many modern interactive flat panels (IFPs) have a built-in computer, or OPS, which allows them to function without an external computer. These displays often come with a built-in digital whiteboard and internet browser, making them a standalone solution. Our smart digital whiteboard is a great example of this.
Q4: How do you write on a smart board?
A4: To write on a smart board, simply pick up the dedicated smart board pen or stylus from its holder. The smart board's software will usually activate a writing tool. You can then use the pen to write, draw, or annotate directly on the screen.
Q5: What is calibration, and why is it important?
A5: Calibration is the process of aligning your touch or pen input with the visuals on the screen. It's important for older smart boards to ensure that when you touch a specific point on the display, the digital ink appears in exactly the right spot. Many newer displays are designed not to require this step.
Conclusion: You're Ready to Master Your Smart Board
Congratulations! You now have a solid understanding of how to operate a smart board, from the simple act of turning it on to the advanced techniques that can elevate your presentations and lessons. We've demystified the hardware, walked through the core functions of pens and erasers, and provided tips for troubleshooting common issues.
Remember, the smart board is a tool designed to empower you. The key is to get hands-on experience and practice. Start with the basics: turn it on, connect your computer, and try annotating a simple file. From there, you can explore the more advanced features like screen sharing and software integration.
Whether you're an educator looking to captivate your students or a business professional aiming to lead more effective meetings, your journey to becoming a smart board pro starts here. Don't be intimidated; embrace the technology. The full potential of your smart board is just a few taps and gestures away. Now go forth and create something amazing!


