


In a Hurry? Here Are the Key Takeaways:
This guide is designed to make you a smart board pro. You’ll learn:
The Basics First: How to confidently use the essential tools like the pen, selector, and eraser to eliminate technical jitters.
Boost Engagement: Simple, powerful ways to turn any lesson into an interactive experience using features like drag-and-drop, screen reveal, and the infinite canvas.
Encourage Collaboration: Techniques to get students out of their seats and working together on group projects, presentations, and problem-solving at the board.
Gamify Learning: How to use your smart board for classroom quiz shows and leverage ready-made smartboard games for classroom activities that make learning fun.
Subject-Specific Strategies: Practical, step-by-step ideas for using your smart board in Math, Science, English, and History lessons.
Pro-Tips for Success: How to save, share, and organize your digital lessons to create a powerful resource for student review and for those who were absent.
Hey there, educators! Let’s talk about that impressive piece of technology standing at the front of your classroom—the interactive whiteboard, or as most of us call it, the smart board. Maybe it was just installed, and you’re staring at it, feeling a mix of excitement and, let’s be honest, a little bit of dread. Or perhaps it’s been there for a while, acting as a very expensive, very fancy projector screen, and you just know it can do more.
You’re not alone. The biggest hurdle for any teacher is figuring out how to seamlessly weave this powerful tool into daily lessons without it feeling clunky or forced. You’re juggling lesson plans, classroom management, and the diverse needs of 20+ students. The last thing you need is another complicated device to master. The pain points are real: the fear of technology failing mid-lesson, the time it takes to create new materials, and the challenge of keeping students focused instead of just mesmerized by the shiny new toy.

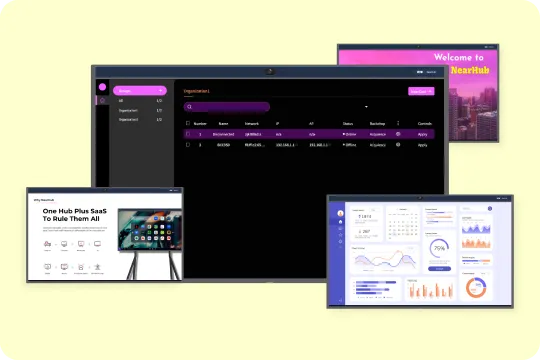
But what if we told you that your smart board, like the intuitive NearHub IWB, isn’t another obstacle? What if it’s the very key to unlocking a more dynamic, engaging, and collaborative learning environment?
This is your ultimate guide. We’re going to break down everything, from turning it on to running advanced, subject-specific activities. We’ll show you exactly how to use a smart board in the classroom to transform your teaching and captivate your students. Let’s turn that intimidating screen into your most valuable teaching assistant.
How to Use a Smart Board: The Absolute Basics for Getting Started
Before we dive into cool classroom activities, let’s walk before we run. Mastering the fundamentals will give you the confidence to explore all the creative possibilities. Think of this as your pre-flight checklist.
Step 1: Understanding the Components
Your smart board system generally consists of a few key parts:
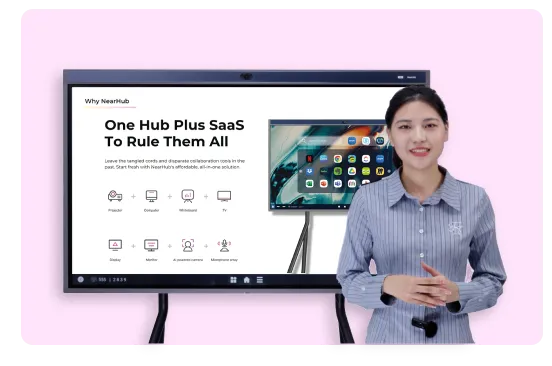
The Interactive Whiteboard (IWB): This is the large, touch-sensitive display itself. Some, like the NearHub, are all-in-one devices with a built-in computer, meaning you don’t need to connect a separate PC. Others require a connection to a computer and a projector.
The Computer: The brain of the operation. It runs the software and holds all your files and lesson plans.
The Projector (for non-integrated systems): This projects the computer’s screen onto the whiteboard. A crucial step here is ensuring it’s aligned correctly. If things aren’t lining up, learning how to calibrate smart board is a non-negotiable first skill.
The Pens & Eraser: These aren’t just plastic props! They are tools that the board recognizes, allowing you to write, draw, and erase digitally. A good smart board marker feels natural and responds instantly.
Step 2: Powering Up and Connecting
First things first, turn everything on! Power up the board, the computer, and the projector (if you have one). Ensure your computer is connected to the board, typically via an HDMI and a USB cable. The HDMI sends the picture, and the USB sends the “touch” information back to the computer. For all-in-one solutions like NearHub, this is much simpler—you just press the power button!

Step 3: Mastering the Basic Toolbar
Every smart board software has a toolbar, and this is your command center. While they vary slightly, they almost all contain these essential tools:
Pen Tool: Select this to write or draw on the board. You can usually change colors, line thickness, and styles. Practice writing a few words. Get a feel for the pressure and speed.
Highlighter Tool: Perfect for emphasizing text or images on the screen without obscuring them.
Eraser Tool: Just like a real eraser, this removes your digital ink. Some have different sizes for clearing small mistakes or wiping the whole page.
Text Tool: Want neat, typed text? Select the text tool, tap the screen, and a keyboard will appear, allowing you to type directly onto your lesson slide.
Shape Tool: Instantly draw perfect circles, squares, triangles, and lines. This is a lifesaver for geometry lessons or creating quick graphic organizers.
Select/Mouse Tool: This is arguably the most important tool. It turns your finger or pen back into a mouse, allowing you to click, drag, and interact with objects on the screen, open files, and navigate your computer. Pro-Tip: Always switch back to the select tool after you’re done writing or drawing.
Spend 15 minutes just playing with these tools. Open a blank page and doodle. Write your name. Draw a house. The more comfortable you are with the basics, the smoother your lessons will be.
How Do You Use a Smartboard in the Classroom for Maximum Engagement?
Okay, you’ve mastered the basics. Now for the fun part! How do you use this tool to grab your students’ attention and keep it? A smart board transforms passive viewing into active participation.
1. Make Any Lesson an Interactive Experience
The static worksheet is a thing of the past. With a smart board, any resource can become a hands-on activity.
Drag-and-Drop Activities: Create matching games for vocabulary words and definitions. Have students drag labels to the correct parts of a diagram (the solar system, a plant cell, a map). You can create these in the smart board software or find templates online.
Reveal and Conceal: Use a digital “screen shade” or simply draw a large box over answers, images, or key terms. As you teach, you can slowly reveal the information, building suspense and focusing attention. This is fantastic for revealing the steps to a math problem one by one.
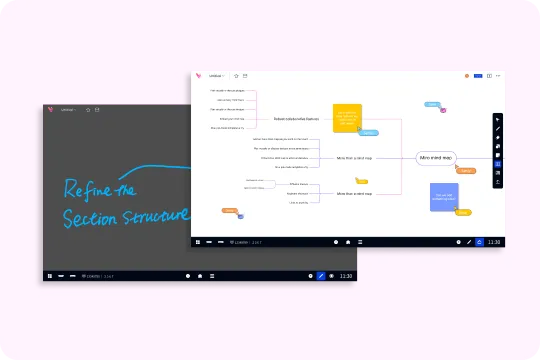
Infinite Canvas: Never run out of board space again! Most smart board software offers an “infinite canvas.” When you run out of room, just slide the page over and keep writing. This is perfect for brainstorming sessions or long-form problem-solving where you want to keep all the work visible.
2. Foster Student Collaboration at the Board
The smart board is a natural focal point for group work. Its size and multi-touch capabilities (on boards like NearHub) mean multiple students can work at the same time.
Group Brainstorming: Pose a question and have student groups come to the board to add their ideas to a mind map. Each group can use a different color to track their contributions.
Team Problem-Solving: Put a complex math problem or a scientific hypothesis on the board. Have a team of students work together to solve it, showing their steps for the rest of the class to see.
Interactive Presentations: Instead of a one-way “show and tell,” have students use the smart board for their presentations. They can pull in videos, highlight key parts of their text, and answer questions by drawing diagrams on the fly.

3. Gamify Learning with a Touch of Fun
Let’s be real: kids love games. The smart board is the ultimate platform for educational gaming that doesn’t feel like a test.
Classroom Quiz Shows: Use templates to create your own “Jeopardy!” or “Who Wants to Be a Millionaire?” review games. Students can tap the board to select their questions and write in their answers.
Puzzles and Timers: Use the board for digital jigsaw puzzles of maps or historical paintings. Use a large, visible timer from the board’s widget library to add a fun sense of urgency to activities like “clean up” or “complete the worksheet.”
Ready-Made Games: You don’t have to reinvent the wheel! There are tons of fantastic, free smartboard games for classroom learning available online that cover every subject and grade level. They are designed to be engaging and are a great way to reward students or break up a long lesson block.
4. Cater to All Learning Styles
One of the biggest benefits of using a smart board is its ability to cater to different learning styles simultaneously.
Visual Learners: They thrive with the diagrams, videos, images, and colors you can display.
Auditory Learners: You can embed audio clips, play podcasts, or have the board’s text-to-speech function read passages aloud.
Kinesthetic Learners: These are the students who need to move. The smart board is a dream for them. They get to come up to the board, touch it, move objects, and write. This physical interaction solidifies their learning.
How to Use a Smart Board in the Classroom for Specific Subjects
Let’s get practical. How does this technology apply to your specific subject area? Here are some concrete ideas to get you started.
For the Math Classroom
A smart board is a math teacher’s best friend. The precision tools and infinite space are game-changers.
Graphing Made Easy: Pull up digital graph paper and use the line tool to plot functions perfectly every time. You can easily move, resize, and annotate graphs without the mess of a dry-erase marker.
Manipulating Shapes in 3D: Use the smart board software to demonstrate geometric transformations. Rotate, reflect, and translate 2D and 3D shapes to help students visualize complex concepts.
Step-by-Step Problem Solving: Use the “reveal” technique to walk students through multi-step equations. You can also record your process of solving a problem and save it as a video for students to review later. It’s like having a dedicated online whiteboard for math that saves every step.

For the English Language Arts (ELA) Classroom
From phonics to Shakespeare, the smart board brings text to life.
Interactive Sentence Diagramming: Forget messy chalkboards. Use the line and text tools to diagram sentences cleanly. Students can come up and drag parts of speech to the correct place in the sentence.
Annotating Texts Together: Pull up a PDF of a short story, poem, or news article. As a class, use the highlighter and pen tools to identify figurative language, find the main idea, or define difficult vocabulary. You can save these annotated notes and share them with the class.
Digital Storyboarding: When planning a creative writing piece, have students use the board to create a storyboard. They can draw simple scenes, add text captions, and easily rearrange the sequence to improve their narrative flow.
For the Science Lab
Make the invisible visible and the complex understandable.
Virtual Dissections: For schools where real dissections aren’t feasible, virtual dissection programs on the smart board provide a fantastic, ethical alternative. Students can “cut,” “pin,” and “label” on the big screen.
Labeling Diagrams: Pull up a high-resolution image of a cell, the water cycle, or a circuit diagram. Have students come to the board and use the pen tool to label the different parts.
Running Simulations: Use online simulations (like those from PhET Interactive Simulations) on the smart board. Let students manipulate variables in a virtual chemistry lab or physics experiment and see the results in real-time on a large, shared screen.
For the History & Social Studies Classroom
Travel through time without leaving your room.
Interactive Timelines & Maps: Use the infinite canvas to create a massive, scrolling timeline of a historical period. Students can add events, images, and primary source documents. With Google Earth on the smart board, you can fly to any location in the world, explore historical sites in 3D, and overlay historical maps on modern geography.
Analyzing Primary Sources: Display a high-resolution scan of a primary source document, like the Declaration of Independence. Let students zoom in on the text, highlight key phrases, and make notes in the margins together.
Connecting Past and Present: Juxtapose historical photos and modern-day images on the board. Create a T-chart where students can list similarities and differences, sparking powerful discussions.
Pro Tips for Using Your Smart Board Like an Expert
You’ve got ideas. You’re feeling confident. Here are a few final tips to take your smart board skills from good to great.
Plan Ahead, But Be Flexible: Prepare your core interactive slides before the lesson begins. Have your videos, links, and images ready to go. However, don’t be afraid to open a blank page to answer a spontaneous student question or explore a tangent.
Establish Classroom Routines: Create rules for using the board. Who gets to come up? How do we take turns? Should we use the special pens or our fingers? Clear expectations prevent chaos.
Save and Share Everything: Get into the habit of saving your annotated lessons at the end of class. You can export them as PDFs or images and upload them to your class website or Google Classroom. This is a massive help for absent students and for review before a test.
Use It for More Than Just Instruction: Your smart board can be a classroom hub. Use it to display the daily schedule, morning messages, classroom jobs, or a countdown timer for transitions.
Don’t Stand in the Way! This sounds simple, but it’s a common mistake. When you’re teaching from the board, be mindful of your position so you’re not blocking the view for half the class.

Conclusion: Your Classroom’s New Superpower
We get it. New technology can feel like one more thing on an already-full plate. But the smart board is different. It’s not about replacing great teaching; it’s about amplifying it.
By learning how to use a smart board in the classroom, you are unlocking a world of interactivity, collaboration, and engagement that was impossible before. You are creating a space where students can see, hear, and touch their learning. From simple drag-and-drop games to complex collaborative projects, this single tool can help you reach every student in your classroom.
So, embrace the screen. Play with the tools. Start with one small interactive element in your next lesson and build from there. Before you know it, you and your students will wonder how you ever taught without it. Your NearHub IWB isn’t just a board; it’s a gateway to a more exciting and effective classroom.
Frequently Asked Questions (FAQs)
Q1: How do you start a lesson on a smart board effectively?
A great way to start a lesson is with a “digital bell ringer.” Prepare a short, interactive activity on the first slide. This could be a quick poll, a “spot the error” sentence, a short matching game, or a thought-provoking question related to the day’s topic. It gets students engaged the moment they walk in and immediately demonstrates the interactive use of the smart board.
Q2: What are the main benefits of using a smart board in the classroom?
The top benefits are increased student engagement, improved collaboration, and the ability to cater to diverse learning styles. Students are more focused when they can interact with the material. It allows for dynamic group work right at the front of the room, and the combination of visual, auditory, and kinesthetic elements helps all students grasp concepts more effectively.
Q3: Can I use a smart board without a dedicated computer and projector?
Yes, you can! Modern interactive whiteboards, like the NearHub IWB, are all-in-one solutions. They have a powerful computer built right into the display, so you don’t need to connect an external laptop or worry about a separate projector. You just turn it on, and it’s ready to go, which simplifies setup and reduces technical issues.
Q4: How can using a smart board help students with special needs?
Smart boards are a fantastic accessibility tool. For students with visual impairments, you can easily increase text size and use high-contrast colors. For those with mobility challenges, the large, touch-sensitive surface can be easier to interact with than a traditional mouse and keyboard. The kinesthetic nature of using the board also greatly benefits students who need physical engagement to learn.
Q5: What are some common mistakes to avoid when using a smart board?
The most common mistake is using it as a simple projector screen and not utilizing its interactive features. Another is not practicing with the basic tools, leading to fumbling during a lesson. A third mistake is creating lessons that are too complex; sometimes, the simplest interactive element is the most effective. Finally, remember to save your work frequently!


