


Are you still bound by the limitations of a traditional whiteboard—a world of smudged markers, limited space, and blurry photos of your best ideas? It’s time to evolve. This comprehensive guide is your key to unlocking the full potential of your interactive smartboard, transforming it from a simple screen into the dynamic heart of your collaborative ecosystem. We will move beyond basic functions and dive deep into creating a workspace that is not only hyper-productive but also visually inspiring. Prepare to learn how to master the art of clean, convertible writing on a whiteboard, build a dynamic picture whiteboard with interactive media, and implement stunning aesthetic whiteboard ideas that bring order and beauty to your projects. From step-by-step instructions on designing a functional weekly dashboard to advanced techniques for hybrid collaboration, this article will show you how to make your smartboard the most powerful tool in the room.
Ever stared at a traditional whiteboard after a marathon brainstorming session and felt a wave of dread? You’re looking at a chaotic swirl of marker smudges, hastily scribbled notes you can barely decipher, and photos awkwardly taped to the surface. You snap a blurry photo with your phone, knowing that valuable context is already lost. The ideas are there, but they’re trapped on a temporary, messy, and decidedly unaesthetic surface.
What if you could capture that same creative energy but make it clean, permanent, shareable, and beautiful? What if your whiteboard wasn’t just a tool, but a dynamic canvas that boosted productivity and actually looked good in your office or classroom?

Welcome to the world of smartboards.
This guide is for you if you’re ready to move beyond the limitations of traditional whiteboards. We’ll dive into how to transform your collaborative space by mastering three key areas:
Elevating your writing on a whiteboard from messy scribbles to clean, editable text.
Creating a powerful picture whiteboard that’s interactive and dynamic.
Bringing it all together with aesthetic whiteboard ideas that inspire creativity and organization.
Get ready to unlock the full potential of your interactive display and say goodbye to whiteboard chaos forever.
Mastering the Art of Writing on a Whiteboard: The Smartboard Revolution
The most fundamental use of any whiteboard is writing. But with a smartboard, the simple act of writing becomes a superpower. It’s not just about jotting down notes; it’s about creating, editing, and sharing information with unprecedented ease.
The Feel of Flawless Digital Ink
One of the first things you’ll notice on a high-quality interactive display is the writing experience. Gone are the days of squeaky, dried-out markers. Modern smartboards offer a smooth, lag-free writing experience that feels just like pen on paper. With features like pressure sensitivity, you can vary your line thickness naturally, creating notes that have character and clarity.
A Toolbox at Your Fingertips: Beyond a Single Pen
Imagine having an entire pencil case available with a single tap. When you’re writing on a whiteboard that’s smart, you have access to:
Multiple Pen Styles: Fine-tip pens for detailed notes, highlighters for emphasis, and brush tools for creative diagrams.
An Infinite Color Palette: Don’t be limited to black, blue, and red. Choose any color imaginable to color-code ideas, differentiate speakers, or simply make your notes more visually engaging.
Eraser Precision: Erase with a swipe of your palm, or use a precision eraser tool to remove a single letter without smudging the rest of your work. It’s clean, simple, and efficient.
The Magic of the Infinite Canvas
Have you ever run out of space mid-thought? It’s one of the most frustrating aspects of a physical whiteboard. A smart electronic whiteboard solves this with an infinite canvas. You can simply pinch to zoom out, pan to a new clean section, and keep the ideas flowing without interruption. All your notes remain in one cohesive document, logically connected and endlessly expandable.
From Messy Handwriting to Clean, Searchable Text
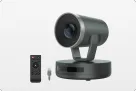
This is where the magic truly happens. Many advanced smartboards, like those from Nearhub, come with Handwriting Recognition technology. With a simple tap, you can convert your handwritten notes into clean, editable digital text.
Benefits of Handwriting-to-Text:
Legibility: Everyone can read the notes, regardless of your handwriting.
Searchability: Once converted, you can search the entire document for specific keywords. Try doing that with a photo of a regular whiteboard!
Professionalism: Instantly create clean meeting minutes or project outlines that are ready to be shared.
By rethinking the simple act of writing, a smartboard lays the foundation for a more organized, efficient, and collaborative environment.

Creating a Dynamic Picture Whiteboard: Beyond Static Images
A picture is worth a thousand words, but an interactive picture is worth a million. A traditional “picture whiteboard” involves tape, magnets, and static printed photos. A smartboard turns this concept on its head, allowing you to integrate, manipulate, and annotate digital images in real-time.
Seamlessly Import Images from Anywhere
Forget the printer. With a smartboard, you can pull images onto your canvas from virtually any source:
Web Search: Use the built-in browser to find and drag-and-drop images directly onto your whiteboard. Perfect for market research, competitor analysis, or finding inspiration.
Cloud Storage: Access your files from Google Drive, OneDrive, or Dropbox.
Local Devices: Instantly share pictures from your laptop or smartphone to the main screen.
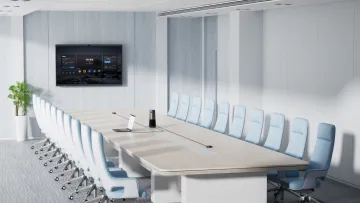
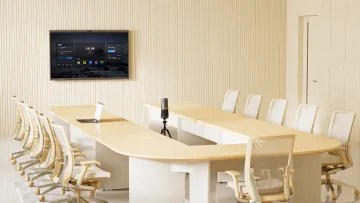
Imagine building a project mood board. In seconds, you can fill the screen with inspirational photos, color swatches, and design mockups. On a large-format display like an 86 board, you have a massive, high-resolution canvas to create a truly immersive and detailed visual plan that the whole team can see and interact with.
Annotate, Highlight, and Bring Pictures to Life
This is where your picture whiteboard becomes a powerful tool for analysis and communication. Once an image is on the board, you can:
Draw directly on it: Circle key areas on a schematic, highlight trends on a graph, or sketch proposed changes on a product photo.
Add text notes: Place typed comments or questions next to specific parts of an image.
Resize and layer: Enlarge a critical detail for discussion or layer images to show before-and-after states.
For example, an architectural team can pull up a blueprint, and the project manager can circle areas needing revision while an engineer adds specific measurements as text notes—all on the same interactive image.
Building a Collaborative Vision Board or Mind Map
A smartboard is the ultimate tool for visual brainstorming. You can create a central idea and have team members add related images, notes, and connectors, building a rich, multimedia mind map. This is far more engaging than simple text. Use pictures to represent goals, user personas, or workflow steps to create a vision board that is both functional and inspiring.

Unlocking Aesthetic Whiteboard Ideas with Smart Technology
Now, let’s bring it all together. An aesthetic workspace is a productive workspace. It reduces mental clutter and fosters a sense of calm and focus. A smartboard, with its sleek design and powerful software, is the key to creating a truly aesthetic whiteboard that is as beautiful as it is functional.
Say Goodbye to Clutter with Digital Templates
A messy, smudged whiteboard creates visual noise. A smartboard allows you to start with a clean, perfectly structured foundation every single time using digital templates.
Project Management: Use built-in Kanban boards, SWOT analysis charts, or project timelines. The columns are perfectly aligned, and you can use digital sticky notes that are always legible and can be moved with a simple drag-and-drop.
Weekly/Monthly Planners: Forget drawing crooked lines for a calendar. Pull up a professional-looking calendar template. You can even integrate it with digital calendar apps to keep your team’s schedule perfectly synced and beautifully displayed.
Creative Layouts: Use templates for storyboarding, Venn diagrams, or flowcharting to give your ideas instant structure and visual appeal.
Curate Your Vibe: Custom Backgrounds and Color Palettes
Your whiteboard should match your brand or your room’s aesthetic. Instead of a stark white background, why not set a custom background?
Subtle Textures: A light woodgrain, a minimalist grid, or a soft linen texture can make the board feel more integrated and less clinical.
Branded Imagery: Use a subtle, watermarked version of your company logo as the background for meetings.
Calm Colors: Instead of bright white, choose a soft gray, beige, or light blue background to reduce eye strain and create a more relaxed atmosphere.
Combine this with a curated color palette for your digital pens and highlighters. Using 3-4 complementary colors instead of a random rainbow of markers instantly makes your notes look more intentional and aesthetically pleasing.
The Minimalist Command Center
The ultimate goal of an aesthetic whiteboard is to create a central “command center” for your team or family that is both powerful and unobtrusive.
For the Office: Display the day’s key metrics, the project Kanban board, and a running list of team goals. Because it’s digital, it can be updated in real-time and never looks messy.
For the Classroom: Post the daily schedule, key vocabulary words with accompanying images, and an interactive “question of the day.”
For the Home: Use it as a family hub with a shared calendar, a visual chore chart, and a digital canvas for kids’ artwork.
By combining the power of clean writing on a whiteboard, dynamic picture whiteboard capabilities, and pre-built aesthetic templates, your smartboard becomes the elegant, hyper-functional heart of any collaborative space.

Step-by-Step: Designing an Aesthetic and Functional Weekly Dashboard
We’ve talked about the “what” and the “why,” so let’s get into the “how.” One of the most powerful aesthetic whiteboard ideas you can implement immediately is a team or personal dashboard. This isn’t just a to-do list; it’s a living, breathing hub for your week. Here’s how to build one from scratch on your smartboard.
Step 1: Choose Your Foundation - Background and Template
Before you write a single word, set the mood. A cluttered or harsh background will doom your aesthetic dashboard from the start.
Select a Custom Background: Instead of the default bright white, navigate to your board’s settings. Choose a calming, off-white color, a subtle light gray, or even a textured background like digital craft paper or a minimalist grid. This small change instantly makes the screen more inviting.
Use or Create a Grid Template: The secret to an organized look is structure. Use a pre-built Kanban or weekly planner template. If you want more customization, create your own simple grid using the line tool. Draw three or four clean vertical columns. A popular and effective layout is:
Column 1: To-Do / Backlog
Column 2: In Progress
Column 3: For Review
Column 4: Done!
Step 2: Populate with Tasks Using Digital Sticky Notes
This is where the magic of a smart electronic whiteboard shines. Instead of messy, real-life sticky notes that fall off, use the digital sticky note feature. Create a note for each task. Why is this better?
Uniformity: Every note is the same size, creating a clean, grid-like appearance.
Legibility: You can type the text, ensuring anyone can read it from across the room.
Rich Content: Some platforms allow you to add more than just text to a sticky note—you can assign it to a person, add a due date, or even include a small icon.
Fill your “To-Do” column with all the tasks for the week. As you start working on something, simply drag the corresponding digital sticky note into the “In Progress” column. The kinetic action of moving the task is satisfying and provides a clear visual update for the entire team.
Step 3: Leverage Color-Coding for At-a-Glance Clarity
Your dashboard should communicate information in seconds. Color is your best tool for this. Assign a color to each team member, project type, or priority level. For example:
Red: High Priority / Urgent
Yellow: Medium Priority
Green: Low Priority
Blue: Assigned to Jane
Orange: Assigned to Mike
By color-coding your digital sticky notes, anyone can look at the board and instantly understand the workload and priorities without having to read every single task. This simple trick elevates your board from a list of chores to a strategic overview.
Step 4: Integrate a Visual “Wins” Section with a Picture Whiteboard
Don’t let the “Done” column just be a graveyard of completed tasks. Make it a celebration! This is a perfect opportunity to use the picture whiteboard functionality. When a major task is completed, drag the sticky note to “Done” and add a relevant, fun visual next to it.
Finished a website mockup? Drop a screenshot of the beautiful design into the column.
Hit a sales target? Paste in a celebratory GIF or a picture of a rising stock chart.
Received positive client feedback? Take a screenshot of the email and pin it to the board.
This practice transforms the dashboard into a source of motivation and team morale. It becomes a visual record of your accomplishments, making everyone feel more connected to the team’s success.

Advanced Smartboard Techniques: From Interactive Media to Hybrid Collaboration
Once you’ve mastered the basics of writing on a whiteboard and creating aesthetic layouts, it’s time to unlock the true power features that set a professional smartboard apart. These advanced techniques will revolutionize your meetings, presentations, and collaborative sessions.
Going Beyond Static Images: Embedding Live Videos and Web Pages
Your smartboard isn’t just a canvas for drawing; it’s a fully interactive multimedia device. The concept of a “picture whiteboard” evolves when you can embed live, functional content.
Interactive Product Demos: Imagine you’re discussing a competitor’s product. Instead of just showing screenshots, use the smartboard’s built-in browser to go to the competitor’s website, and then “clip” or embed that live web page directly onto your whiteboard canvas. You can scroll, click, and interact with the live site right next to your own team’s notes and diagrams.
Video Analysis: Need to review a recorded user testing session or a new marketing video? Drag the video file directly onto the board. You can play the video for the group, pause it at a critical moment, and then use the digital pen tools to draw directly on the paused frame. Circle the user’s point of confusion or highlight a visual element that needs to be changed. This provides precise, contextual feedback that is impossible to achieve otherwise.
Mastering Layers for Complex Diagrams and Presentations
Think of your smartboard canvas like a stack of transparent sheets, similar to layers in Adobe Photoshop. This advanced feature is a game-changer for organizing complex information.
Build-Up Animations: When explaining a complex process or system architecture, don’t overwhelm your audience by showing the final diagram all at once. Instead, put each stage of the process on a separate layer. Start with Layer 1 (the foundation), explain it, and then make Layer 2 visible to show the next step. This “build-up” technique keeps your audience engaged and makes complex topics much easier to understand.
Annotation Overlays: You can have a core image or diagram on a base layer (e.g., a map, a blueprint, or a financial chart). Then, create a new layer on top for annotations. This allows you to freely write, draw, and brainstorm all over the image without actually altering the original. You can then toggle the annotation layer on and off to see the original, clean image.
Unlocking True Hybrid Collaboration: Bridging the Distance
This is perhaps the single most important function of a modern smartboard in today’s work environment. It’s the bridge that connects your in-office team with your remote colleagues, creating one seamless, unified meeting experience.
Real-Time, Two-Way Interaction: A truly collaborative platform allows a team member in the conference room to be writing on a whiteboard while a remote employee, logged in from their laptop at home, sees every stroke appear instantly. But it doesn’t stop there. The remote employee can also use their mouse or trackpad to add their own notes, shapes, or images to the same canvas.
A Shared Digital Space: Imagine your lead designer in New York standing in front of a massive 86 board, circling a key element of a new UI design. Simultaneously, the lead developer in San Francisco sees that annotation appear on their screen and immediately types a technical question right next to the circle. This fluid, real-time conversation, happening on a shared visual plane, eliminates the communication lag and misunderstandings that plague typical hybrid meetings. It ensures that everyone, regardless of their physical location, has an equal opportunity to contribute.

Conclusion
We’ve journeyed from the chaotic smudges of a traditional whiteboard to the clean, powerful, and beautiful world of the interactive smartboard. It’s clear that this technology does more than just replace markers with styluses—it fundamentally transforms how we capture, interact with, and share ideas.
By mastering digital writing on a whiteboard, you create notes that are legible, editable, and infinitely scalable. By embracing the picture whiteboard, you turn static images into dynamic tools for analysis and brainstorming. And by focusing on aesthetic whiteboard ideas, you build an environment that is not only more productive but also more inspiring and pleasant to work in.
A smartboard is an investment in clarity, collaboration, and creativity. It’s time to erase the limitations of the past and draw a brighter, more efficient future for your team.
Ready to see how a Nearhub board can revolutionize your space? Explore our range of interactive displays and find the perfect fit for your needs.
FAQs (Frequently Asked Questions)
Q1: How can a smartboard improve my digital writing on a whiteboard?
A smartboard dramatically improves digital writing by offering a smooth, lag-free experience, multiple pen tools and colors, and an infinite canvas so you never run out of space. The most powerful feature is handwriting-to-text conversion, which instantly turns your notes into clean, searchable, and shareable digital text.
Q2: What are the best ways to use a picture whiteboard for team collaboration?
The best way to use a picture whiteboard is to make it interactive. Use it to build a collaborative mood board by pulling images from the web, annotate directly on charts or mockups to provide clear feedback, and create rich, visual mind maps that combine images with text and drawings to spark more creative brainstorming sessions.
Q3: Can a smartboard really help me create aesthetic whiteboard ideas for my office?
Absolutely. A smartboard is perfect for creating an aesthetic workspace. You can use clean, pre-made digital templates for calendars and project boards, set custom backgrounds (like your brand’s logo or a calming texture), and use curated color palettes. This eliminates the physical clutter and smudges of traditional whiteboards, resulting in a sleek, modern, and organized “command center.”
Q4: Is a smart electronic whiteboard better than a traditional one for brainstorming?
Yes, a smart electronic whiteboard is significantly better for brainstorming. Its infinite canvas means you never have to stop the flow of ideas to erase. You can easily move, group, and connect ideas, integrate multimedia like images and videos, and most importantly, save the entire session with one click. Every note and diagram is preserved perfectly and can be shared instantly with all participants.