


This article addresses the common challenge of “whiteboard fright”—the apprehension that prevents educators and professionals from effectively utilizing whiteboards for visual communication. It posits that effective whiteboard drawing is not an innate artistic talent but a learnable skill accessible to all. The methodology presented is centered on a foundational “visual alphabet,” a simple set of geometric shapes that can be combined to illustrate complex ideas. The guide provides a comprehensive collection of over 100 practical ideas and applications, tailored specifically for enhancing student engagement in educational settings and fostering clarity and collaboration in corporate environments through techniques like mind mapping and process visualization. By offering step-by-step tutorials for essential icons and exploring the advanced capabilities of interactive whiteboards like Nearhub, this article serves as a practical resource designed to equip readers with the confidence and techniques to transform abstract concepts into simple, memorable, and fun whiteboard drawings.
Ever stood in front of a big, blank, gleaming whiteboard, marker in hand, with a room full of expectant faces staring back at you? The pressure is on. You have a brilliant idea, a lesson plan, a project workflow… but how do you get it from your brain onto the board in a way that’s not just a wall of text?
Maybe you’ve thought, “I can’t even draw a straight line,” or “My stick figures look like wobbly aliens.” You’re not alone. This “whiteboard stage fright” is real. We see this incredible tool for collaboration and creativity, but we feel limited by our own perceived lack of artistic talent. The fear of creating a messy, confusing, or just plain ugly drawing can stop us from even trying.
But what if we told you that you don’t need to be Picasso to make a powerful impact? What if the secret to transforming your presentations, lessons, and meetings lies in a handful of simple, easy, and—dare we say—fun drawing techniques?

This is your ultimate guide. We’re here to demystify the art of the whiteboard. We’ll show you how easy white board drawing can become your superpower, turning monotonous monologues into dynamic dialogues. Get ready to explore a world of simple sketches, engaging doodles, and effective visual communication that anyone, and we mean anyone, can master. Let’s turn that intimidating blank space into your canvas for success.
Why Bother with Fun Whiteboard Drawings? More Than Just Doodles
Before we dive into the “how,” let’s talk about the “why.” You might be thinking, “Is this really worth the effort?” Absolutely. Incorporating fun whiteboard drawings into your daily routine, whether in a fourth-grade classroom or a Fortune 500 boardroom, has profound benefits that go far beyond simple decoration.
Boosts Engagement and Attention: Let’s face it, our attention spans are shorter than ever. A visual element—a simple icon, a quick sketch, a colorful diagram—can instantly recapture wandering minds. When people see you drawing, they’re not just listening; they’re watching. This dual-sensory input makes your message far more compelling.
Increases Memory Retention: Studies have shown that people remember information more effectively when it’s presented with visuals. The “Picture Superiority Effect” is a cognitive phenomenon where we are more likely to remember pictures than words. When you draw a concept, you’re creating a memorable visual anchor for your audience. That simple drawing of a lightbulb next to a new idea? They’ll remember it.
Simplifies Complex Ideas: Some concepts are just plain hard to explain with words alone. Think about a complex workflow, a scientific process, or a strategic framework. An easy whiteboard drawing, like a flowchart or a simple diagram, can break down that complexity into understandable, digestible chunks. It transforms the abstract into the concrete.
Fosters a Collaborative Atmosphere: When you start drawing, it sends a message: “This is a creative, open space. All ideas are welcome.” It’s less formal and intimidating than a static PowerPoint slide. It invites others to come up, grab a marker (or a stylus on a Nearhub board!), and add their own thoughts. It turns a one-way presentation into a two-way conversation.
Unleashes Creativity and Innovation: The act of drawing itself can spark new ideas. As you sketch out a mind map or a customer journey, you might see connections you hadn’t considered before. It’s a form of visual thinking that can unlock innovative solutions and lead to powerful brainstorming sessions.
So, the next time you pick up that marker, remember you’re not just doodling. You’re creating a more engaging, memorable, and collaborative environment.

Getting Started with Easy White Board Drawing: The Basics
The journey to becoming a confident whiteboard artist begins with a single line. The biggest secret? You already know how to draw everything you need. Seriously. If you can write the alphabet and draw a few basic shapes, you have the complete toolkit for easy white board drawing.
The Visual Alphabet: Your Building Blocks
Think of this as your ABCs of drawing. Every complex image in the world can be broken down into these simple components:
A dot
A line (straight, curved, wavy)
A circle (or oval)
A square (or rectangle)
A triangle
An angle
A spiral
That’s it. Look around you. A person? A circle for a head, rectangles for a body, lines for arms and legs. A house? A square with a triangle on top. A lightbulb? A circle with a spiral inside and a small square at the bottom. Once you internalize this “visual alphabet,” the fear of drawing melts away. You’re no longer “drawing a person”; you’re just combining a few simple shapes you already know.
The Power of the Stick Figure
Never underestimate the stick figure! It’s the MVP of whiteboard communication. But you can easily level up your stick figures to make them more expressive.
Add Joints: Instead of straight lines for arms and legs, use two lines connected by a dot (for an elbow or knee). This allows you to show movement and posture. Is the person running? Cheering? Thinking? Suddenly, your stick figure has personality.
Express Emotion: You don’t need a detailed face. Simple changes to the eyebrows and mouth can convey a wide range of emotions. A simple U-shape for a smile, an upside-down U for a frown. Two angled lines for eyebrows can show anger or surprise.
Use a “Thick” Body: Instead of a single line for the torso, use a simple rectangle or oval. This gives your figure more presence on the board and makes it easier to see from a distance.
Essential Tips for Clean and Clear Drawings
Use Thick Lines: Use chisel-tip markers or the thicker pen settings on your Nearhub board. Thin, spidery lines are hard to see from the back of the room.
Embrace Color, But Don’t Overdo It: Color is your friend! Use it to highlight key points, differentiate between ideas, or simply add visual appeal. A good rule of thumb is to stick to 2-3 colors per drawing. Black for the main structure, and then a color like blue or green for emphasis, and red for things that need immediate attention.
Write in Print, Not Cursive: When adding text, always use clear, simple print. Block letters are best. Cursive is difficult to read from a distance.
Leave Plenty of White Space: Don’t crowd your board. White space (or negative space) is crucial for readability. It gives your audience’s eyes a place to rest and helps them focus on what’s important. With a Nearhub interactive whiteboard, you have an infinite canvas, so you’ll never run out of room!

Fun Whiteboard Drawings for the Classroom That Captivate Students
Teachers, this is for you. In a classroom, a whiteboard is more than a teaching tool; it’s a stage. And your fun whiteboard drawings are the props that can bring any lesson to life. Forget text-heavy slides and get ready to engage your students like never before.
Daily Warm-Ups and Icebreakers
“Guess the Doodle”: Start the day with a quick Pictionary-style game. Draw a simple object related to the day’s lesson (e.g., a pyramid for history, a plant cell for science) and have students guess what it is.
“Emotion of the Day”: Draw a few simple faces with different expressions and ask students to circle the one that best represents how they’re feeling. It’s a great social-emotional learning (SEL) check-in.
“Add to the Drawing”: Start a simple drawing—say, a landscape with a single tree. Each day, have a different student come up and add one new element. By the end of the week, you’ll have a collaborative masterpiece.
Bringing Subjects to Life
History: Don’t just talk about historical events; draw them! Create simple timelines with icons, draw maps of famous voyages, or sketch out the key figures involved. A stick-figure battle scene is far more memorable than a date on a slide.
Science: Science is inherently visual. Draw the water cycle with smiling cloud and sun characters. Sketch out the layers of the Earth. Illustrate a food web with simple animal drawings. This makes abstract concepts tangible and easy to grasp.
Language Arts: Visualize vocabulary! For the word “enormous,” draw a tiny stick figure next to a giant elephant. Create story maps with boxes for characters, setting, problem, and solution, using simple icons for each.
Math: Make math problems visual. Use drawings to explain fractions (a pizza with slices), geometry (drawing shapes and finding angles), or word problems (sketching out the scenario).
Using an interactive whiteboard elevates these activities. You can turn your drawings into interactive puzzles, drag-and-drop labels, and even incorporate exciting smartboard games for classroom activities. The possibilities are endless when your canvas is digital.
More Than Just Doodles: Easy Whiteboard Drawings for Engaging Meetings
In the corporate world, we’re drowning in data and text. An easy whiteboard drawing can be a life raft, cutting through the noise to deliver a clear, concise, and collaborative message. It’s time to transform your status updates and brainstorming sessions.

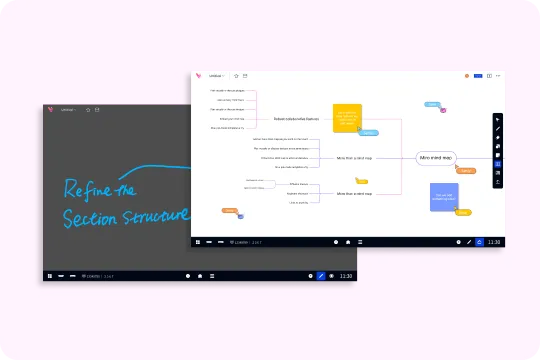
The Ultimate Brainstorming Tool: Mind Mapping
A mind map is the quintessential whiteboard drawing for business. It’s a non-linear way to capture and connect ideas.
Start in the Center: Write your main topic or problem in the middle of the board and draw a circle around it.
Branch Out: Draw lines radiating out from the center for your main sub-topics or categories.
Add Keywords and Icons: On each branch, write a single keyword or a short phrase. Next to it, draw a simple, representative icon. The combination of word and picture is incredibly powerful.
Use Color: Assign a different color to each main branch to keep things organized and visually distinct.
Visualizing Workflows and Processes
Flowcharts are perfect for explaining processes, from a sales funnel to a software development lifecycle.
Use Standard Shapes: You don’t have to reinvent the wheel. Use ovals for start/end points, rectangles for process steps, and diamonds for decision points.
Keep It Simple: Don’t get bogged down in details. Focus on the high-level steps. Your goal is clarity, not a comprehensive technical document.
Draw, Don’t Just Write: Instead of writing “Customer Clicks ‘Buy Now’,” draw a simple computer mouse clicking a button. This visual shorthand is faster to draw and easier to understand.
Strategic Frameworks Made Easy
Don’t just talk about your SWOT analysis; draw it! Create a simple four-quadrant grid. In each box (Strengths, Weaknesses, Opportunities, Threats), use bullet points combined with simple icons. A thumbs-up for strengths, a thumbs-down for weaknesses, a rising sun for opportunities, and a storm cloud for threats. This visual representation makes the entire strategy instantly accessible to everyone in the room.
The beauty of a digital tool like a Nearhub IWB is that you can save your drawings, share them instantly with the team via email or QR code, and even convert your handwritten notes into editable text. The collaboration doesn’t have to end when the meeting is over.
Step-by-Step Guides to Easy Whiteboard Drawings Anyone Can Master
Ready to get practical? Let’s walk through how to draw a few common and useful icons. Remember the visual alphabet! We’re just combining shapes.
How to Draw: A Bright Idea (A Lightbulb)
This is perfect for brainstorming sessions or highlighting a great suggestion.
Step 1: Draw a large circle in the middle of your space.
Step 2: At the bottom of the circle, draw two parallel vertical lines coming down.
Step 3: Connect the bottom of those two lines with a horizontal line. You now have the base.
Step 4: Inside the base, draw three short, wavy horizontal lines. This is the screw thread.
Step 5: Inside the main circle, draw a loopy, M-shaped line to represent the filament.
Step 6 (Optional): Add small lines radiating out from the top of the bulb to show that it’s lit up.
How to Draw: A Person or Customer
Great for representing users, team members, or customers.
Step 1: Draw a circle for the head.
Step 2: Draw a simple rectangle or oval for the body, attached to the bottom of the head.
Step 3: For the arms, draw two lines coming from the “shoulders” of the rectangle. Add small circles at the end for hands.
Step 4: For the legs, draw two lines coming from the bottom of the rectangle. Add small ovals or half-circles at the bottom for feet.
Step 5: Add a simple face: two dots for eyes and a U-shape for a smile.
How to Draw: A Goal or Target
Ideal for sales meetings, project kickoffs, or setting objectives.
Step 1: Draw a large circle.
Step 2: Inside that circle, draw a slightly smaller circle.
Step 3: Inside the second circle, draw an even smaller circle.
Step 4: Color in the smallest, innermost circle. You’ve created a classic target.
Step 5 (Optional): Draw an arrow pointing to the center of the target. An arrow is just a long line with a triangle at the end.
Practice these a few times, and they’ll become second nature. You’ll soon be able to whip them out in seconds during a meeting or lesson.

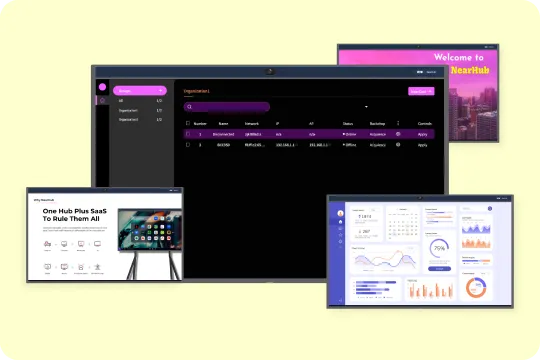
Level Up Your Fun Whiteboard Drawings with a Nearhub IWB
Traditional whiteboards are great, but interactive whiteboards (IWBs) like Nearhub take your drawing capabilities to a whole new level. They bridge the gap between the intuitive, free-form nature of a physical whiteboard and the power of digital technology.
An Infinite Canvas for Infinite Ideas
Have you ever been in the middle of a brilliant brainstorming session only to run out of space on the board? It completely kills the creative flow. With Nearhub’s infinite canvas, you never have to erase a good idea again. Just pan and zoom to find fresh space, allowing your ideas to grow organically without limits.
A Universe of Color and Tools
Your creative toolkit is no longer limited to four marker colors. A digital whiteboard gives you an entire spectrum of colors at your fingertips, much like the extensive whiteboard fox colors palette, allowing for more nuanced and organized diagrams. Plus, you get access to digital tools that make drawing even easier:
Shape Recognition: Draw a wobbly circle, and the Nearhub software can automatically snap it into a perfect geometric shape.
Perfect Lines: Create perfectly straight lines for charts and diagrams with a simple tool.
Multiple Pen Styles: Choose from different pen thicknesses and styles, from a fine-point pen to a thick highlighter.
Easy Erasing: No more messy smudges or ghosting. Erase with precision or clear the whole board with a single tap.
Seamless Integration and Collaboration
This is where a Nearhub board truly shines. You can insert images from the web, add sticky notes, and embed videos directly onto your canvas. The experience is incredibly intuitive, much like using the best drawing app for ipad for kids; it’s designed to be simple and powerful. Team members can connect their own devices and contribute to the drawing in real-time, whether they’re in the same room or across the globe. When you’re done, you can save your entire visual masterpiece as a PDF or image and share it instantly.
Frequently Asked Questions (FAQs)
Q1: What are some simple ideas for easy whiteboard drawings to start with?
A: Great question! Start with the basics from the “visual alphabet.” Practice drawing simple icons like a star, a heart, a cloud, a checkmark, and a simple smiley face. Then move on to the step-by-step guides in this article, like the lightbulb or the target. Another fantastic starting point is drawing simple objects around you: a coffee cup, a book, or a plant. The key is to see them not as complex objects, but as a collection of simple shapes.
Q2: How can I make my fun whiteboard drawings look more professional for a business meeting?
A: To add a professional touch to your fun whiteboard drawings, focus on clarity and structure. Use a limited color palette (e.g., black, blue, and one accent color like green). Keep your drawings simple and iconic. Use a ruler tool (if on a digital board) for straight lines in charts. Most importantly, use clear, printed handwriting and leave plenty of white space. A well-organized, clean board with simple visuals will always look more professional than a cluttered, overly artistic one.
Q3: Do I really need artistic skills for easy white board drawing?
A: Absolutely not! This is the biggest misconception. Easy white board drawing is about communication, not creating fine art. If you can draw a square, a circle, and a line, you have all the artistic skill you need. The goal is to convey an idea quickly and effectively. A simple, clear stick figure that explains a process is far more valuable than a detailed but confusing portrait.
Q4: How can I use fun whiteboard drawings to make learning more inclusive for all students?
A: This is a wonderful application. Visuals are a universal language. For students who are visual learners, English language learners, or have certain learning disabilities, your fun whiteboard drawings can be a powerful bridge to understanding. By representing concepts visually, you provide an alternative way to process information that isn’t dependent on heavy text or complex vocabulary. Collaborative drawing activities also allow students who may be shy about speaking up to participate and express their ideas.
Conclusion: Your Whiteboard Is Waiting
That vast, empty whiteboard doesn’t have to be a source of anxiety. It’s a land of opportunity. It’s a tool waiting to be unlocked, and you now hold the keys.
We’ve shown you that easy white board drawing isn’t about talent; it’s about technique. By mastering a few simple shapes and embracing the power of visual communication, you can transform the way you teach, lead, and collaborate. You can make complex ideas simple, boring meetings engaging, and abstract lessons tangible.
Whether you’re using a classic marker or the dynamic digital stylus of a Nearhub interactive whiteboard, the principles are the same. Start simple. Be bold. Have fun. Your ideas are worth seeing, not just hearing.
So, the next time you stand in front of that board, take a deep breath, pick up your marker, and draw. You might just surprise yourself.


