


Five minutes. High-stakes client presentation. You walk into the conference room, and your stomach drops. The "maze of cables".
You plug in your laptop. Nothing. The screen mocks you: "No sync or signal."
Your remote team starts joining the call. "Are you there? We can't hear you." You're fumbling with remotes, facing the dreaded "Audio Woes"—echoes, muffled voices, or just dead silence.
You can feel the "general sense of helplessness". The clock is ticking, and your perfectly planned meeting has been "derailed". It’s frustrating and "embarrassing".
We've all been there. And it's not your fault.
For years, we’ve been given powerful software like Zoom, but forced to run it on clunky, outdated hardware. This is the definitive guide to fixing that. We'll cover everything from your first setup to running a massive "global exchange conference." We’ll explore how innovative all-in-one solutions are finally ending the conference room wars.
Welcome to the last guide on Zoom you’ll ever need.
The Conference Room Nightmare: Why Is Traditional AV So Painful?
Why is the tech meant to connect us so often the problem? It's what I call the "Piecemeal Fallacy." We were sold separate "good" cameras, "good" mics, and "good" displays that "don't talk to the system". Most "conference room av equipment" fails because it was never designed as an integrated system. This is the root of the 13 minutes wasted at the start of every meeting and the "digital distance" that makes remote participants feel checked out.
See if this checklist of frustrations sounds familiar.
Audio Woes: "Can You Hear Me Now?"
This is, without a doubt, the #1 complaint in hybrid meetings. You’ve experienced it all:
- Low Volume: People in the back of the room are "continuously interrupting" to say, "I'm sorry, what was that?".
- Muffled Voices: The microphone isn't picking up the voice clearly, making everyone sound like they're "underwater".
- Echoes and Feedback: Separate speakers and microphones clash, creating a painful, distracting echo.
- Dead Zones: The microphone is placed at one end of the table, making some participants inaudible.
These issues happen because the audio components are fighting each other, or they aren't designed for the room.
The Cable Tangle & "Input Roulette"
A "maze of cables" isn't just an eyesore; it's a productivity killer. This is the "dongle nightmare". Your new laptop only has USB-C, but the room only offers HDMI. You’re faced with a wall of "confusing input options". "Wrong cable. Wrong resolution. Wrong adapter". The meeting grinds to a halt while you play "input roulette," trying to find the one combination that will make your presentation show up.
Video & Display Failures: "Why is the Screen Blank?"
The next hurdle is the video. You’re staring at a blank screen or the "no sync or signal" error. When you finally get an image, it's often "blurry" or at the wrong resolution. These problems are magnified in larger rooms, where finding a high-quality camera for zoom meeting that can clearly capture everyone is a major challenge.
These failures aren't just technical. They’re emotional. They make you look unprepared. But the solution isn't to become an AV expert. The solution is to get technology that doesn't require you to be one.
First, let's master the software.

How to Set Up a Zoom Conference: The Definitive 101 Guide
Before you can run a flawless conference, you need to get the fundamentals right. This is your step-by-step guide to scheduling a secure, professional meeting every single time.
Step 1: Your Zoom Account and App
First, the basics. While you don't need a Zoom account to join a meeting, you absolutely need one to host.
- Get an Account: Go to the Zoom website and sign up. A Basic (free) license is great, but be aware it has a 40-minute time limit on meetings with 3 or more participants. A Pro account removes this limit and adds key features like cloud recording.
- Download the App: Do not rely on the web browser. Download and install the Zoom "desktop client". The app is more stable, has more features, and gives you better control during the meeting.
Step 2: Scheduling Your First Meeting
You can schedule from the Zoom app or the web portal. Let's walk through the options in the app, as it's the most common way.
- Open the Zoom app and click the blue "Schedule" icon.
- A window will pop up. Here's what to fill in:
- Topic: Give your meeting a clear, descriptive name (e.g., "Q4 Marketing Sync," not "Zoom Meeting").
- Date & Time: Set when your meeting will happen.
- Duration: Select how long you expect the meeting to last. Pro Tip: This is just for your calendar. Zoom will not automatically end your meeting when the duration runs out (unless you're on a Basic plan).
- Recurring Meeting: Check this box if it’s a daily stand-up, weekly check-in, or monthly review.
Step 3: Configuring Your Meeting for Success (and Security)
This is the most important part of the setup. Don't skip it! Security in Zoom isn't an "advanced" feature; it's a "must-do" part of the scheduling process.
- Meeting ID: You have two choices:
- Generate Automatically: (Recommended) This creates a unique, one-time ID for this meeting. It's the most secure option.
- Personal Meeting ID (PMI): This is your permanent, static "phone number" for Zoom. Never use your PMI for public meetings. Think of it as your private office; only give it to people you trust for quick, informal chats.
- Security (The Big Two):
- Passcode: (Do this) Always require a passcode. This is your first line of defense.
- Waiting Room: (Do this) This is your best line of defense against "Zoombombing". When enabled, participants can't join the meeting until you, the host, manually admit them. It gives you full control over who enters.
- Video & Audio:
- Video: You can set whether the Host and Participants video should be On or Off by default when joining.
- Audio: Set this to "Telephone and Computer Audio" (or "Both") to give your participants the most flexibility.
- Advanced Options (The Good Stuff):
- Enable join before host: Use this with caution. It lets people join before you get there. If you have a Waiting Room enabled, this is less of a risk.
- Mute participants upon entry: (Highly Recommended) For any meeting with more than a few people, check this box. It prevents the chaos of 10 people joining at once with background noise.
Step 4: Inviting Your Attendees
Your meeting is scheduled. Now, how do you get people there?
- The Best Way (Calendar Integration): At the bottom of the "Schedule" window, select "Google Calendar" or "Outlook Calendar". Zoom will automatically create a calendar event with all the invitation details. Just add your guests and send the invite.
- The Easy Way (Copy Invitation): After you save the meeting, find it in your "Meetings" tab. Click on it, and you'll see an option to "Copy Invitation".
- The In-App Way: You can also invite people directly from your Zoom "Contacts" list.
That's it. You've scheduled a secure, professional Zoom meeting. Now, let's talk about what to do when you're live.

You're the Host: A Playbook for Running a Flawless Meeting
Setting up the meeting is one thing. Running it is another. As the host, you have a powerful set of controls. Knowing where they are and what they do is the key to looking like a pro and handling any situation with confidence.
Mastering the Host Controls (Your In-Meeting Dashboard)
When you're the host, you'll see a control bar at the bottom of your screen with extra buttons. The most important one is the Security icon.
Think of the Security Icon as your in-meeting "panic button" and control panel. If a meeting ever starts to get chaotic, click this first. From here, you can instantly:
- Lock Meeting: Once all your expected guests have arrived, you can lock the door. No new participants can join, period.
- Enable Waiting Room: If you forgot to turn it on during scheduling, you can toggle it on mid-meeting.
- Manage Participant Permissions: This is your fine-grained control. In one click, you can prevent all participants from:
- "Share Screen"
- "Chat"
- "Rename Themselves"
- "Unmute Themselves"
Managing Your Participants Panel
The "Participants" button is your command center for people. Clicking it opens a list of everyone in the meeting. From here, you can:
- Admit / Remove: See who's in the Waiting Room and "Admit" them one by one. You can also hover over a disruptive participant's name and "Remove" them.
- Mute / Unmute: You can "Mute" an individual participant who has a barking dog in the background.
- Mute All: At the bottom of the panel, you'll find the magic "Mute All" button. This mutes everyone at once.
- Ask All to Unmute: After a presentation, instead of the awkward silence, you can use "Ask All to Unmute," which sends a pop-up to all participants asking them to unmute.
- Video Control: You can't start someone's video for them (for privacy), but you can "Stop Video" if a participant is showing something inappropriate or distracting.
How to Share Your Screen Like a Pro
This is the #1 place where meetings fall apart. Follow these steps for a perfect screen share every time.
- Click the green "Share Screen" icon.
- A window will pop up asking what you want to share. You have two main choices:
- Desktop 1: This shares your entire screen. Everyone will see everything you see, including your email notifications, your messy desktop, and your private messages. It's easy, but risky.
- A Specific Application (e.g., "PowerPoint" or "Chrome"): (Recommended) This is safer and more professional. Participants will only see that one window, even if you click on other things on your computer.
- The Two Most Important Checkboxes: Before you click "Share," look at the bottom-left of that window.
- "Share Sound": If you are playing a video or anything with audio, YOU MUST CHECK THIS BOX. Otherwise, they will see the video, but you'll be the only one who can hear it.
- "Optimize for Video Clip": If you are sharing a fast-moving video, check this box too. It ensures a smoother framerate for your viewers.
Pro-Tip for Sharing Saved Video Files: If you have a video file (like an MP4 or MOV) saved on your computer, there's a better way.
Click "Share Screen" > Go to the "Advanced" tab at the top > Select "Video file". This uses Zoom's built-in player, which provides a "smoother and more stable viewing experience" than just sharing your screen.
Recording Your Session (Local vs. Cloud)
Need to save the meeting? Click the "Record" button. You'll be given two options (if you have a paid account):
- Local Recording: This is available to all (free and paid) users. It saves the video file (an MP4) directly to your computer's hard drive. It's fast, free, and great for your own personal archive.
- Cloud Recording: This (paid) feature saves the recording directly to your Zoom account in the cloud. The big advantage? When the recording is ready, you get a simple link to share. No uploading or attaching huge files. You can also record different layouts, like "Speaker View" and "Gallery View," as separate files.

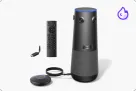
Product Spotlight: Premium Camera
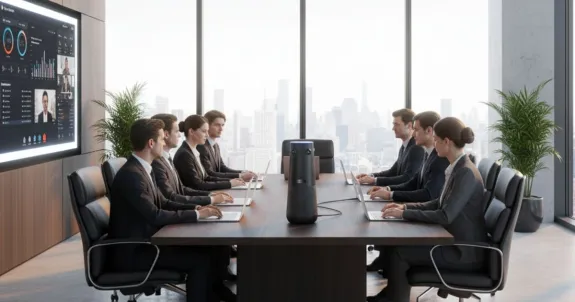
You've mastered the software, but what about the hardware? How do you really solve the "Conference Room Nightmare"? The answer isn't more cables and components; it's a single, intelligent device: the Nearity 360 Alien.
This is the all-in-one solution designed to make the AV chaos disappear. It's a sleek, 360-degree conferencing device that combines a high-definition camera, a powerful microphone array, and an intelligent speaker into one plug-and-play unit. It's not just a webcam; it's a complete meeting hub.
Here’s how it intuitively solves your biggest problems:
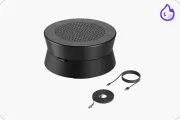
- Solves "Audio Woes": The 360 Alien features a sophisticated 6-microphone array. This system uses AI-powered beamforming to automatically locate who is speaking—even from across the room—and isolates their voice, all while filtering out distracting background noise and echo. Everyone is heard with crystal clarity, eliminating the "can you hear me?" dance.
- Solves "Video Failures": Its 360-degree, 4K camera captures the entire room at once. But its real magic is the AI-driven speaker tracking. When someone talks, the camera automatically and smoothly frames them, creating a dynamic, broadcast-quality experience. It's like having a professional video director in your meeting, ensuring remote participants never miss a cue.
- Solves the "Cable Tangle": This is the best part. The Nearity 360 Alien replaces your separate camera, multiple microphones, and external speakers. It connects to your laptop or room PC with a single USB cable. That's it. One plug. The "input roulette" is over.
The Nearity 360 Alien finally closes the "digital distance." It makes remote participants feel like they are truly in the room, able to see and hear everyone clearly. For in-room attendees, the technology becomes so simple it's invisible, letting you start your meeting with one touch and focus on what matters: the conversation.

Going Pro: Advanced Zoom for Next-Level Engagement
Once you've mastered the basics (and your hardware), you can start using Zoom's more advanced features to turn a boring lecture into a truly interactive session.
Engaging Your Audience with Polls
Polls are the fastest way to get real-time feedback and keep your audience engaged. You can create them before your meeting (via the web portal when you edit the meeting) or during the meeting by clicking the "Polls" icon.
- Create: Add your title and questions. You can choose single-choice or multiple-choice.
- Launch: When you're ready, click "Launch Poll." You and your participants will see the results come in, in real-time.
- Share: When you "End Poll," you'll get a final tally. You can then click "Share Results" to show everyone the outcome.
Fostering Collaboration with Breakout Rooms
This is Zoom's single most powerful collaboration feature. It allows you to split your main meeting into many smaller, private sessions.
- Setup: Click the "Breakout Rooms" icon. You can choose to:
- Assign Automatically: Zoom will randomly and evenly split everyone.
- Assign Manually: You drag and drop participants into the rooms you want.
- Let Participants Choose: You can create rooms (e.g., "Topic A," "Topic B") and let people join the one that interests them.
- Management: As the host, you can "Broadcast a message to all" rooms, and you can "Close All Rooms" to bring everyone back to the main session.
- Pro-Tip: If you are cloud recording, Zoom only records the main room. Nothing in the breakout rooms is captured by the recording.
The "Engagement Workflow": Using Polls to Create Breakout Rooms
This is the ultimate pro-tip for large sessions. What if you could instantly sort dozens of people into breakout rooms based on their interests? You can.
- Before the meeting (or during): Create a new poll.
- On the question you want to use for sorting: Click the toggle that says "Create Breakout Rooms".
- Crucial Detail: This will not work if you've made the poll anonymous. Zoom needs to know who answered what.
- During the meeting: Launch your poll. For example: "Which topic do you want to discuss?" with the options "A: Marketing," "B: Sales," "C: Product."
- End the poll: Once the answers are in, click "End Poll."
- The Magic Button: On the results window, you will now see a "Create Breakout Rooms" button. Click it.
- Zoom will instantly create breakout rooms (e.g., "Marketing," "Sales," "Product") and automatically move all the participants into the room they just voted for. This is a game-changing workflow for large workshops and classes.

Scaling Up: From Team Huddle to "Global Exchange Conference"
What if your "conference" is a… well, a conference? Running a large-scale virtual event like a "global exchange conference" requires a different level of planning.
Meeting vs. Webinar: Choosing the Right Tool
First, you must decide if you're hosting a Meeting or a Webinar. They are not the same thing, and choosing the wrong one can be disastrous.
- Use a Meeting for: Interactive sessions, workshops, and team collaboration where you want audience participation and everyone to be able to talk and see each other.
- Use a Webinar for: Large-scale broadcasts, public talks, and events where attendees are primarily "view-only".
Here's a quick comparison:
| Feature | Zoom Meeting | Zoom Webinar |
|---|---|---|
| Use Case | Interactive, collaborative sessions | Broadcast, large events, public talks |
| Participants | All can share audio/video | Only Host/Panelists share. Attendees are view-only |
| Interaction | Chat, Breakout Rooms | Q\&A, Polls, Chat (Host can disable) |
| Capacity | Up to 1,000 with add-on | Up to 10,000+ |
| Features | Full collaboration | Registration pages, Branding, Q\&A panel |
Logistics for Your Large-Scale Virtual Event
The bigger the event, the more you need to plan for the human logistics, not just the technical ones.
- The Technical Plan:
- Go Wired: Do not, under any circumstances, host a major event on Wi-Fi. Hardwire your computer directly to your internet router.
- Have a Backup: Have a contingency plan. A cell-phone hotspot can be a lifesaver if your main internet goes down.
- Do a Dry Run: Schedule a "practice session" with all your panelists before the event. Test their audio, video, and screen sharing to make sure everything works.
- The Human Plan (The "Global" Challenge):
- Time Zones: This is the #1 enemy of a "global" event. The solution is to record everything and make all sessions available on-demand for attendees who are asleep during the live event.
- Screen Fatigue: No one can (or wants to) stare at a screen for eight straight hours. Plan for shorter sessions (e.g., 45 minutes) followed by scheduled breaks.
- Accessibility & Inclusivity: This isn't a "day-of" feature; it's a planning step. This means enabling live captioning, providing materials in advance, and being mindful of inclusive language. This planning is what makes a virtual conference more accessible and inclusive than an in-person one.

Your Secret Weapon: The Role of Instructional Technology Services
Feeling overwhelmed? That's what the pros are for.
When you see the term "instructional technology services" (or ITS), you might think of the university help desk. But in the corporate world, these are the expert teams (also called AV Integrators or Corporate Learning Services) that are your secret weapon.
They are the professionals responsible for the design, creation, and distribution of effective educational and corporate training experiences.
Why do you need them?
Remember the "Conference Room Nightmare"? Instructional Technology Services is the team you hire to prevent it from ever happening.
- They are the ones who can do a proper acoustic assessment of your room.
- They provide the "technical staffing for live events" for your big global conference, handling the "live mixing and audio engineering," "video capture," and "live streaming," so you can focus on hosting.
- For corporate training, they are the ones who design the engaging, interactive training programs that actually improve employee skills.
Think of it as the complete solution:
- The Platform: Zoom
- The Hardware: Nearity 360 Alien (the all-in-one system that solves the AV chaos)
- The Service: Instructional Technology Services (the human experts who will recommend, install, and run it all for you)
Conclusion: Stop Fighting Your Tech and Start Connecting
We’ve come a long way from that "maze of cables." You've gone from the panic of a failed connection to the confidence of a "pro host" who knows how to manage everything from a simple huddle to a global conference.
The goal was never to become an AV technician. The goal was to connect. To share ideas, to collaborate with your team, and to build relationships, whether your audience is in the same room or on the other side of the world.
This guide gives you the knowledge to run a great Zoom conference. But to truly solve the problem, you need to fix the underlying hardware.
Stop accepting that 13 minutes of every meeting will be wasted just trying to get started. Stop letting "good enough" AV create "digital distance" and make your remote teammates feel like second-class citizens.
The solution is an integrated, all-in-one system that just works. You need important toolkit. It's the hardware that finally lets your software shine, letting your meetings start on time, every time.
Ready to build a conference room that actually works?
Frequently Asked Questions (FAQ)
1. Do I need a Zoom account to join a meeting?
No! You can join as a participant without an account byclicking the host's link or by going to the Zoom website and entering the Meeting ID. An account is only required if you want to host your own meetings.
2. How do I schedule a basic Zoom meeting?
The easiest way is in the Zoom app or web portal. Sign in, click "Schedule." Choose your date and time, give it a topic, and—most importantly—set a "Passcode" and "Waiting Room" for security. Then click "Save".
3. How do I invite people to my Zoom meeting?
After you schedule your meeting, you can either select "Google Calendar" or "Outlook Calendar" to create an invite automatically. Or, you can click "Copy Invitation" to copy all the meeting details, which you can then paste into an email, text message, or chat.
4. My camera or microphone isn't working on Zoom. What should I do?
First, check the basics: In the Zoom meeting, make sure you've clicked "Start Video" and "Unmute." Next, make sure no other applications (like Skype, FaceTime, or Microsoft Teams) are open and using your camera. Inside Zoom, click the small arrows next to the Mute and Video buttons to make sure the correct camera and microphone are selected. If all else fails, restarting your computer fixes 90% of these issues.
5. What's the best way to secure my Zoom meeting from uninvited guests?
The "Waiting Room" is the single best tool. This feature puts everyone in a virtual lobby, and you, the host, must "Admit" them individually. This gives you 100% control over who enters. Using a "Passcode" is also a mandatory best practice for all your meetings.